
Creating Public or Corporate Enrolment Link
SUPERSEDED: Please refer to the SOP – Creating a Public Enrolment Link Using CLAUDE AI – This SOP should only be used if completing an enrolment link manually
Expected Task Completion Time:
Beginner: 10 minutes per enrolment link
Advanced Operator: 4m 50s minutes per enrolment link
What are public enrolment links
Follow these steps when creating an enrolment link for a public course or when creating an enrolment link for a corporate client who wants their staff to pay for their own enrolments.
Difference between public and corporate enrolment links
The difference between a public enrolment link and an enrolment link used for a corporate client is as follows. Corporate enrolment links contain:
- Amended terms and conditions
- Corporate clients need to acknowledge that their employer/event organiser has arranged this training on their behalf and that the suitability of the course has been determined by their employer/event organiser.
- Individual students must acknowledge/understand that the course is being paid for by their employer; however, in the event that their employer fails to make payment, course participants will not receive their award (Certificate) unless they themselves pay for their individual enrolment. The enrolment fee will be consistent with what was quoted to the event organiser. Should the course participant not wish to receive their award, Intelligent Training Solutions will not pursue the individual student for the outstanding fees.
- No third-party payment section
- Corporate enrolment links have the ‘Nominate a third party to pay for this enrolment’ section removed as these types of enrolment links require the event organiser to pay for the entire class.
- Intelligent Training Solutions creates the individual student’s login credentials to the Learner Portal, should that be required.
NOTE: If a corporate client requires the individual course participant to pay for their enrolment, then a public enrolment link template should be used for the corporate client.
Creating the public enrolment link
Follow the steps below to create your enrolment link.
Checking the PDF
When you receive an enrolment link request form, check for completeness. The key information needed is as follows:
- When does the enrolment link need to be completed by
- Details of the enrolment link (units/qualification)
- Is the enrolment link for a public course? (If not, follow the steps below for creating a corporate enrolment link.)
- Has the staff member requesting the enrolment link provided you with specific course details: You will need to know:
- Proposed course date
- Start time
- Course end time
- Number of expected participants
- Is there a personal study component required for this course
- Has the course been added to our Google Calendar (Calendar: ITS Course Calendar)
- Are there any additional comments
Be sure to collect any missing information from the staff member requesting the enrolment link before proceeding, as this will same time later.
Logging into the Enrolment Website
To log in to the Enrolment Website, visit: https://enrolments.its.edu.au/wp-login.php
Selecting Gravity Forms to create your enrolment link
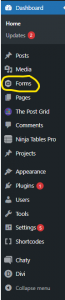
Next, using the left-hand side menu bar, locate and click on ‘Forms‘
Searching for the enrolment link templates
Use the ‘Search Forms‘ search box to locate the enrolment link templates. Search for the word ‘TEMPLATE‘ to filter through all the forms.
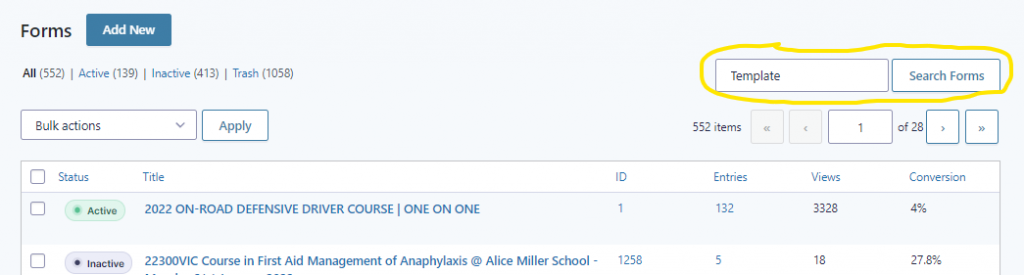
Next, scroll through the list of templates until you find the template for the enrolment link you require. For example, if you want to create an enrolment link for an upcoming (public ) HLTAID009 Provide CPR course in Sunbury, you would be searching the list for the ‘HLTAID009 Provide Cardiopulmonary Resuscitation (CPR) @ Location – Date – TEMPLATE – v2022.xx‘
NOTE: Be sure only to use the latest version of the template. For example, v2022.2 would indicate that this particular enrolment link/file was created in 2022 and is version number two. Always use the latest version.

Creating a duplicate copy of the template for use
Hover over the enrolment link template you wish to duplicate. This will display a min-menu. Click ‘Duplicate‘ to create a copy of the template.
WARNING: Never alter the original template. Always create a copy.
After clicking duplicate, the webpage will refresh. Scroll down the list and locate the newly created enrolment link titled ‘HLTAID009 Provide Cardiopulmonary Resuscitation (CPR) @ Location – Date – TEMPLATE – v2022.xx (1)’. You can also search for ‘(1)‘ using the ‘Search Forms’ feature at the top of the screen.

Activating the template
Next, click the inactive button to activate the enrolment link.
TIP: Activating the enrolment link makes it live and usable on the website.

Modifying the template for your requirements
Form Settings
Hover your mouse over the settings menu. See the example below: (Edit | Settings | Entries | Preview | Duplicate | Trash). This will prompt the system to display another menu. Select ‘Form Settings‘ from this menu.
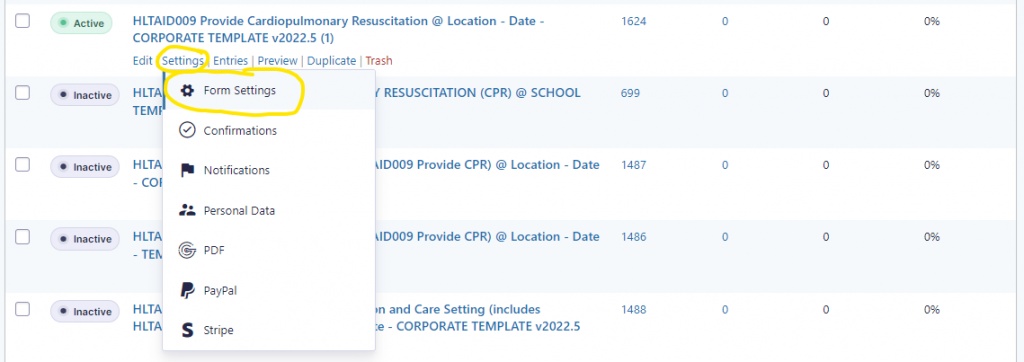
Modify the name of the form to best represent the requirements of the enrolment link. It is important to remember that the name you give the ‘Form Title‘ field will be the name of the enrolment link.
EXAMPLE
If you are creating an enrolment link for a CPR course held in Sunbury on Saturday, the 25th of February 2023, you would change the name of the form title from HLTAID009 Provide Cardiopulmonary Resuscitation (CPR) @ Location – Date – TEMPLATE – v2022.xx (1) to HLTAID009 Provide Cardiopulmonary Resuscitation (CPR) Sunbury – Saturday 25th February 2023

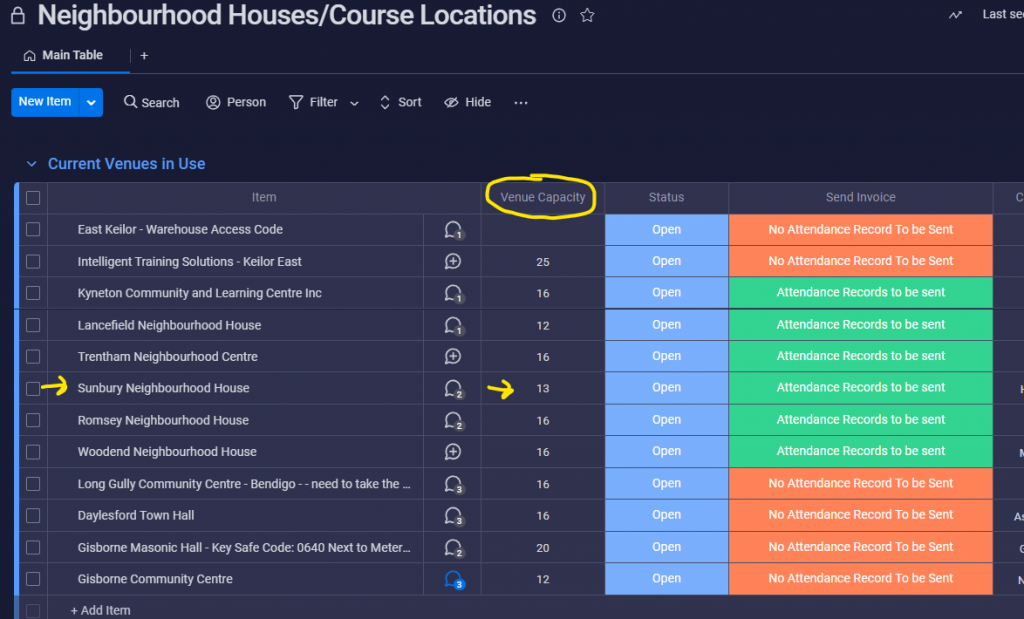
Scrolling down the Form Settings page, look under the section titled ‘Restrictions‘. For public courses, make sure that the ‘Enable entry limit‘ checkbox is ticked. The ‘Number of Entries‘ field should reflect (be set) the venue’s maximum student capacity number. The field titled ‘Entry Limit Reached Message‘ should contain the following message:
“Sorry, currently, this course is fully booked, and our enrolment link has been closed.
We may have had a last-minute cancellation, so if you are interested in joining this course, please call us on 03 5415 0204 to check availability.”
Once all the fields have been updated, click the ‘Save Settings‘ button located at the bottom of the webpage.
NOTE: Information on a venue’s maximum capacity can be found on Monday.com under the board titled ‘Neighbourhood Houses/Course Locations’.
Checking the Enrolment Form
Once the form has been saved, click on the ‘Edit‘ menu tab to review the fields within the enrolment form.
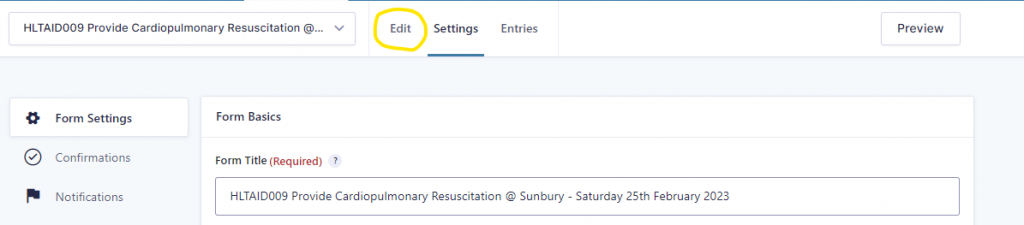
NOTE: There should not be any changes required within this section of the form. You are only reviewing the names of the fields to ensure nothing needs to be updated on the template/form. Please take this opportunity to review the price of the items we attempt to up-sell to the student (for example, first aid kits, printed certificates etc…). If anything needs to be altered or prices changed, please contact the system designer/webmaster.
Confirmations
Next, you will need to review the confirmation settings of the enrolment link. The confirmation section is what the student sees on their screens after they submit their enrolment form. To review these settings, hover your mouse over the ‘Settings‘ menu tab located at the top of the screen. Hovering your mouse over the ‘Settings‘ menu tab will show/display another menu. Select ‘Confirmations‘ from this menu.
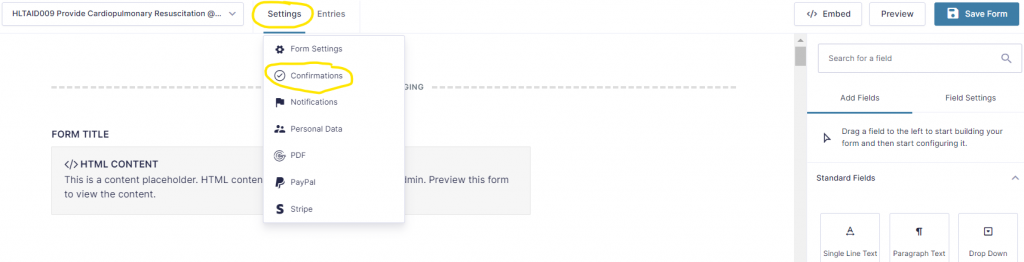
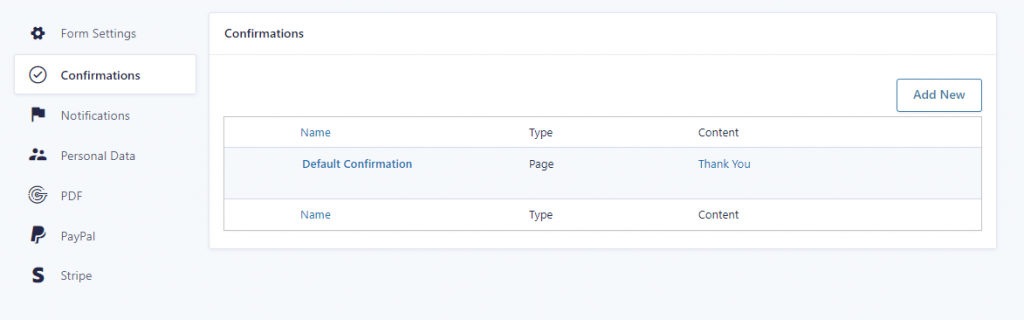
Reviewing the confirmation settings is simple. Once the confirmations webpage opens, check to see that the settings are as follows within the table displayed:
- Name – Default Confirmation
- Type – Page
- Content – Thank You
Notifications
Next, select the’ Notifications’ menu tab using the left-hand side menu on the screen.
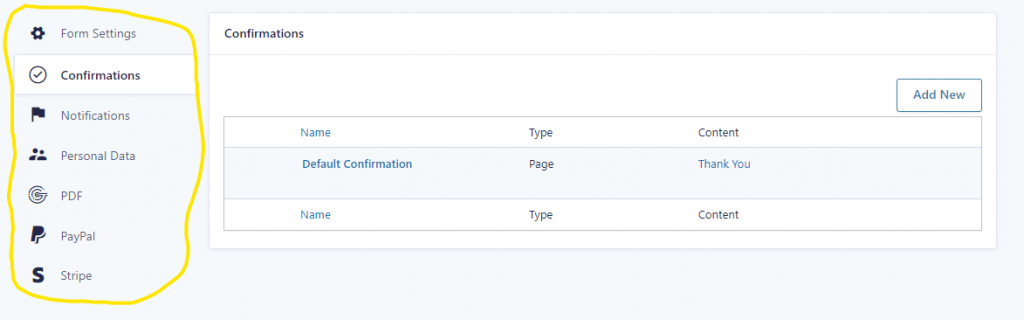
Just as you previous did, hover over the form titled ‘Student Welcome Email‘. This will prompt a menu to appear. Select the ‘Edit‘ menu from the available choices.

Once the Student Welcome Email is open, scroll down to the section titled ‘Message (Required)‘. The messages section contains the welcome email automatically sent to a student after they click the submit button on their enrolment form.
Modify the student welcome email as required. Be sure to read through the entire email and remove any unnecessary statements, trainer names, course locations etc…
WARNING: Take care in reviewing this section, as we don’t want students to receive information that is non-relevant or out of date!
When finished, click the ‘Update Notification’ button at the bottom of the webpage.
Adding PayPal as a payment option
Once again, using the left-hand side menu on the screen, select the ‘PayPal’ menu tab.
- Locate and click the ‘Add New‘ button.
- In the field titled ‘PayPal Email Address (Required)‘ enter the I.T.S PayPal email address (our PayPal Email Address is: accounts@its.edu.au)
- The ‘Mode‘ field should be set to Production
- Using the dropbox arrow in the Transaction Type field, select ‘Products and Services’ – NOTE: Selecting this item will prompt a page refresh
- Scroll down to the section titled ‘Other Settings‘
- Update the ‘Last Name‘ by selecting ‘Family Name (Surname)’ as the option.
- Update the ‘Email’ field by selecting ‘Your preferred email address‘
- Update the Image URL field with the following URL: https://www.its.vic.edu.au/wp-content/uploads/2014/07/ITS-Logo-Original-e1406081456661.jpg
- Update the Cancel URL field with the following URL: https://www.its.vic.edu.au/
- Tick the checkboxes titled ‘Do not prompt buyer to include a shipping address.’ AND ‘Do not prompt buyer to include a note with payment.‘
- Tick the checkbox titled ‘Enable Condition‘. This will open a new menu.
- Use the first of the three dropdown fields to select ‘PLEASE SELECT YOUR PREFERRED PAYMENT METHOD‘
- Use the third of the three dropdown fields to select ‘PAY VIA PAYPAL – ADDITIONAL 3%‘
Click the ‘Save Settings‘ button when finished. By completing these steps above, you have now provided students with the option of paying for their course using PayPal.
Adding Stripe (Credit Card Payments) as a payment option
Using the left-hand side menu on the screen, select the ‘Stripe‘ menu tab.
- Locate and click the ‘Add New‘ button.
- Using the dropbox arrow in the Transaction Type field, select ‘Products and Services’ – NOTE: Selecting this item will prompt a page refresh
- Scroll down to the section titled ‘Stripe Payment Form Settings‘
- Update the ‘Customer Email’ field by selecting the option ‘Your preferred email address‘
- Scroll down to the section titled ‘Other Settings’
- Update the ‘Stripe Receipt’ field by selecting the option ‘Your preferred email address‘
- Tick the checkbox titled ‘Enable Condition‘. This will open a new menu.
- Use the first of the three dropdown fields to select ‘PLEASE SELECT YOUR PREFERRED PAYMENT METHOD‘
- Use the third of the three dropdown fields to select ‘PAY VIA CREDIT CARD – ADDITIONAL 3%‘
Click the ‘Save Settings‘ button when finished. By completing these steps above, you have now provided students with the option of paying for their course using a credit card.
Creating the corporate enrolment link
Follow the steps below to create your corporate enrolment link.
Checking the PDF
When you receive an enrolment link request form, check for completeness. The key information needed is as follows:
- When does the enrolment link need to be completed by
- Details of the enrolment link (units/qualification)
- Is the enrolment link for a corporate course? (If not, follow the steps below for creating a public enrolment link.)
- Has the staff member requesting the enrolment link provided you with specific course details: You will need to know:
- Name of the event organiser/employer/community group
- Delivery Location (including address)
- Contact details of the authorised person (name, contact number, email address
- Information on enrolment fees.
- Proposed course date
- Start time
- Course end time
- Number of expected participants
- Is there a personal study component required for this course
- Has the course been added to our Google Calendar (Calendar: ITS Course Calendar)
- Are there any additional comments
Be sure to collect any missing information from the staff member requesting the enrolment link before proceeding, as this will same time later.
Logging into the Enrolment Website
To log in to the Enrolment Website, visit: https://enrolments.its.edu.au/wp-login.php
Selecting Gravity Forms to create your enrolment link
Next, using the left-hand side menu bar, locate and click on ‘Forms‘
Searching for the enrolment link templates
Use the ‘Search Forms‘ search box to locate the enrolment link templates. Search for the word ‘TEMPLATE‘ to filter through all the forms.
Next, scroll through the list of templates until you find the template for the enrolment link you require. For example, if you want to create an enrolment link for an upcoming (corporate) HLTAID009 Provide CPR course for Google, you would be searching the list for the ‘HLTAID009 Provide Cardiopulmonary Resuscitation (CPR) @ Location – Date – CORPORATE TEMPLATE – v2022.xx‘
NOTE: Be sure only to use the latest version of the template. For example, v2022.2 would indicate that this particular enrolment link/file was created in 2022 and is version number two. Always use the latest version.

Creating a duplicate copy of the template for use
Hover over the enrolment link template you wish to duplicate. This will display a min-menu. Click ‘Duplicate‘ to create a copy of the template.
WARNING: Never alter the original template. Always create a copy.
After clicking duplicate, the webpage will refresh. Scroll down the list and locate the newly created enrolment link titled ‘HLTAID009 Provide Cardiopulmonary Resuscitation (CPR) @ Location – Date – CORPORATE TEMPLATE – v2022.xx (1)’. You can also search for ‘(1)’ using the ‘Search Forms’ feature at the top of the screen.
Activating the template
Next, click the inactive button to activate the enrolment link.
NOTE: Activating the enrolment link makes it live and usable on the website.
Modifying the template for your requirements
Form Settings
Hover your mouse over the settings menu. Example (Edit | Settings | Entries | Preview | Duplicate | Trash). This will prompt the system to display another menu. Select ‘Form Settings‘ from this menu.
Modify the name of the form to best represent the requirements of the enrolment link. It is important to remember that the name you give the ‘Form Title‘ will be the name of the enrolment link.
EXAMPLE
If you are creating an enrolment link for a corporate CPR course for Google on Saturday, the 25th of February 2023, you would change the name of the form title from HLTAID009 Provide Cardiopulmonary Resuscitation (CPR) @ Location – Date – CORPORATE TEMPLATE – v2022.xx (1) to HLTAID009 Provide Cardiopulmonary Resuscitation (CPR) – Google Australia – Saturday 25th February 2023

Scrolling down the Form Settings page, look under the section titled ‘Restrictions‘. For corporate courses, make sure that the ‘Enable entry limit‘ checkbox is unticked.
Once all the fields have been updated, click the ‘Save Settings‘ button located at the bottom of the webpage.
Checking the Enrolment Form
Once the form has been saved, click on the ‘Edit‘ menu tab to review the fields within the enrolment form.
NOTE: There should not be any changes required within this section of the form. You are only reviewing the names of the fields to ensure nothing needs to be updated on the template/form. Please take this opportunity to review the price of our up-sell items (first aid kits, printed certificates etc…). If anything needs to be altered or prices changed, please contact the system designer/webmaster.
Confirmations
Next, you will need to review the confirmation settings of the enrolment link. The confirmation section is what the student sees on their screens after they submit their enrolment form. To review these settings, hover your mouse over the ‘Settings‘ menu tab located at the top of the screen. Hovering your mouse over the ‘Settings‘ menu tab will show/display another menu. Select ‘Confirmations‘ from this menu.
Reviewing the confirmation settings is simple. Once the confirmations webpage opens, check to see that the settings are as follows within the table displayed:
- Name – Default Confirmation
- Type – Page
- Content – Thank You
Notifications
Next, select the ‘Notifications‘ menu tab using the left-hand side menu on the screen.
Just as you previous did, hover over the form titled ‘Student Welcome Email‘. This will prompt a menu to appear. Select the ‘Edit‘ menu from the available choices.
Once the Student Welcome Email is open, scroll down to the section titled ‘Message (Required)‘. The messages section contains the welcome email automatically sent to a student after they click the submit button on their enrolment form.
Modify the Student Welcome Email as required. Be sure to read through the entire email and remove any unnecessary statements, trainer names, course locations etc…
WARNING: Take care in reviewing this section, as we don’t want students to receive information that is non-relevant or out of date!
When finished, click the ‘Update Notification‘ button at the bottom of the webpage.
IMPORTANT NOTE: Unlike public enrolments, Intelligent Training Solutions creates an individual student’s login credentials for the Learner Portal should that be required.
PayPal or Stripe for corporate enrolment links
A corporate enrolment link requires the event organiser/employer/community group to make payment for all their course participants on one invoice; therefore, PayPal and Stripe do not need to be set up on corporate enrolment links.
Posting an enrolment link online
The next few steps involve taking the newly created enrolment form and converting it to a usable link that students use to complete and submit their enrolment forms.
Form Title/Name
Before we can create the actual enrolment link (URL) needed by students, we must first write down or copy (recommended) the name of the form title. To achieve this, click on the ‘Settings‘ menu tab at the top of the form.
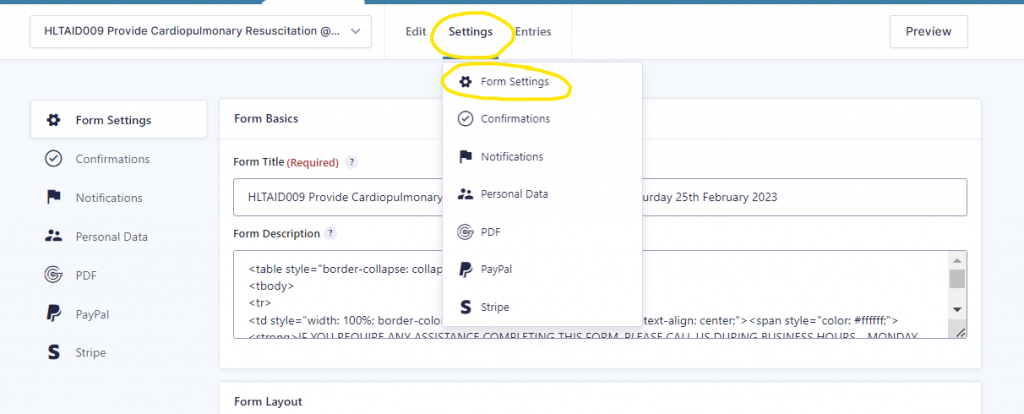
Once the Form Settings webpage is open, highlight and copy the ‘Form Title’ field.

Setting up a new webpage (URL)
Using the left-hand side menu, click on the menu item titled ‘Posts‘

Once the Posts webpage is open, find and click on the ‘Add New‘ button.

Next, in the field titled ‘Add a New Post‘, type the words ‘Enrolment In:‘ and paste the copied text (form title) behind the “:” symbol.
Located on the right-hand side of the screen, you will see a settings menu titled ‘Categories‘. Search for, and select the category titled ‘Enrolment Form‘. Then click the ‘Publish‘ button.
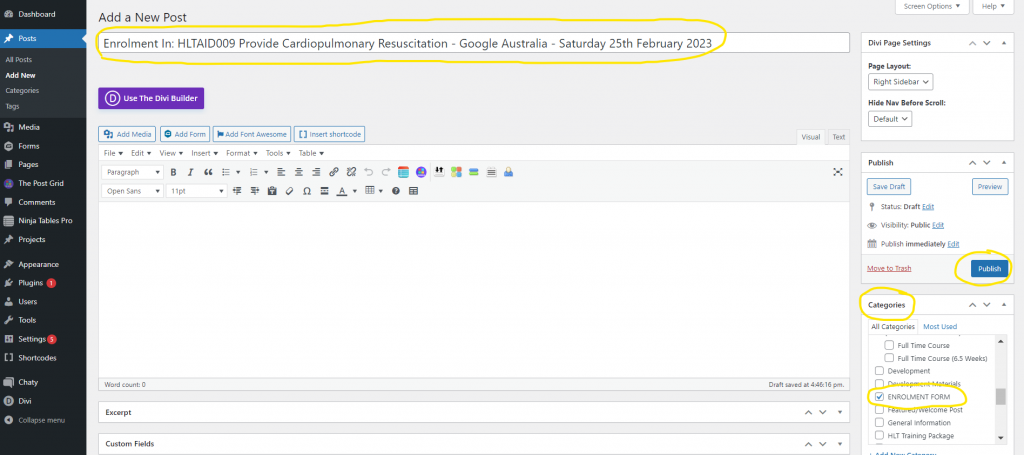
Next, click the purple button called ‘Use The Divi Builder’. This will prompt the webpage to refresh itself and display a list of three options for a form design. Select the Green (third) option titled ‘Clone Existing Page‘
NOTE: It is not uncommon for the webpage to refresh itself multiple times before allowing you to select an option.
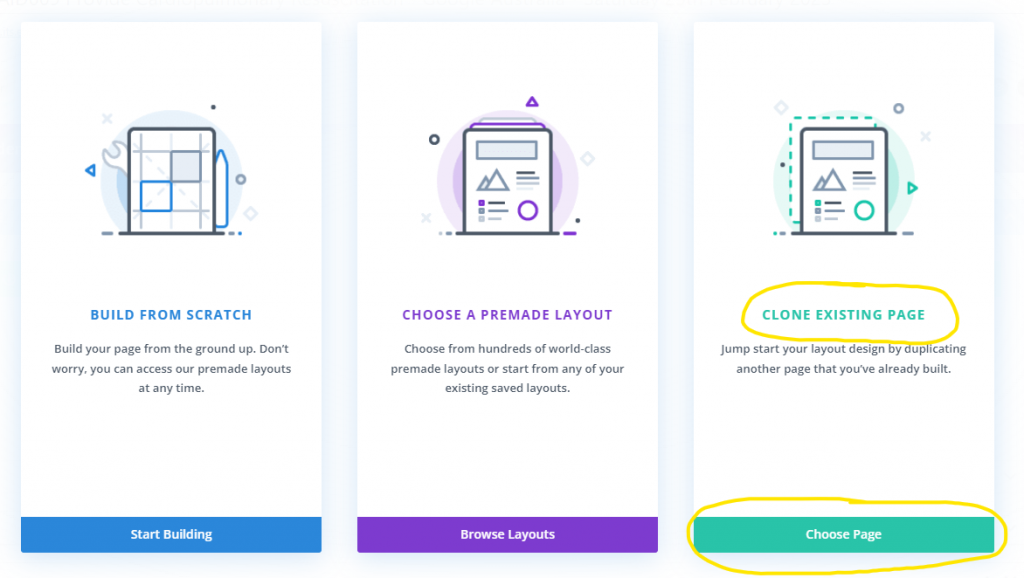
Select ‘Your Saved Layouts‘ from the top purple menu bar.

Next, select the template titled ‘New Enrolment Form Template 2023.x’, then click on ‘Use This Layout‘
TIP: Always select the latest version of this template.
PROCEDURE UPDATE: 24/11/2022
During the latest system update of the DIVI theme, it has been reported that when creating a new post from a template, the system will add an extra section to the webpage. This section is not required and if left in place, will create a large white space between the blue menu bar and the enrolment form. If you notice this extra section on your webpage after using a template, please go ahead and delete it.
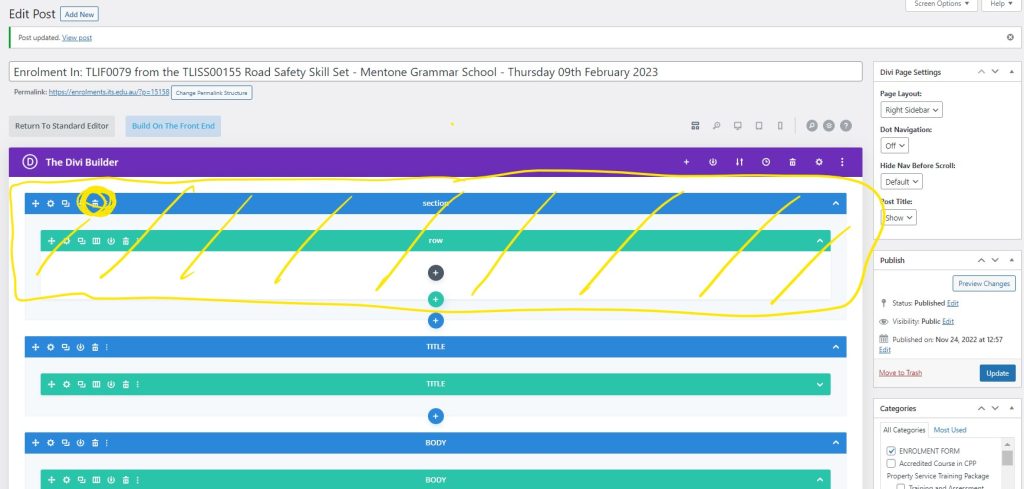
Modifying the webpage title
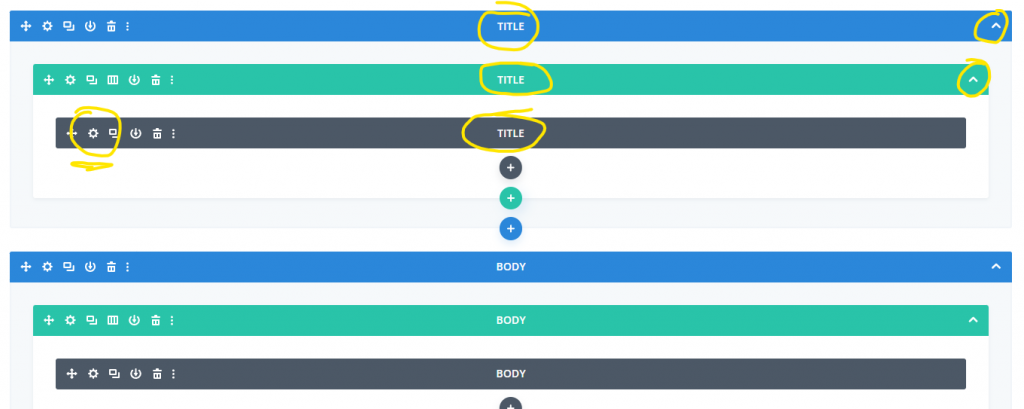
Once the template you select has opened, select the down arrow on the blue bar titled ‘Title‘. This will cause the webpage editor to display the layer hidden beneath. Keep selecting the down arrow on each new layer until you reach the black layer. The black layer contains the text visible to the student on the website.
Once you see the black layer, click the gear icon to open the editor.
Remember: For this next step, you will first need to uncover the text within the body section. As the text is written in white font, you will first see an empty or blank section in the Body Section of the screen.
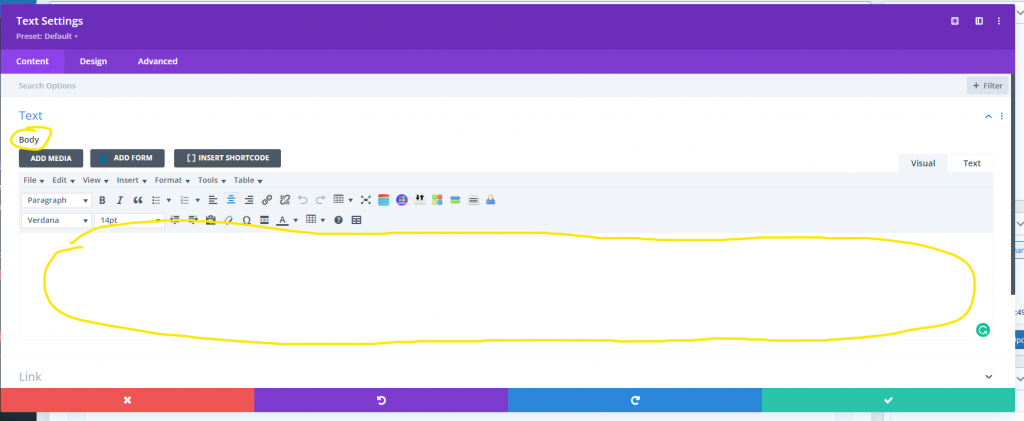
To make the text visible, click anywhere in the white text box of the body section. Then press ALT + A on your keyboard. This will highlight or select all within the field. Once the text within the field has been highlighted, make the text black using the font colour icon.
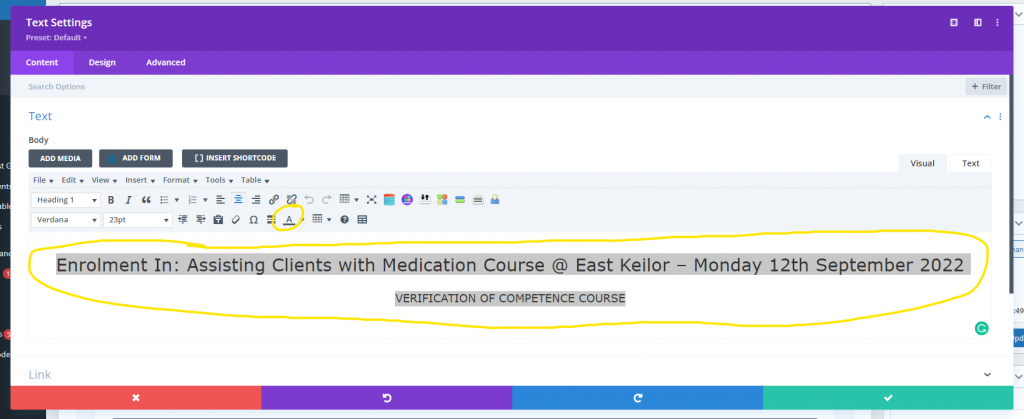
Next, you need to edit the text within the field, replacing everything after the ‘:‘ symbol with the updated form name. You should be able to click in the space straight after the ‘:‘ symbol and paste (ALT + V) the new form title straight in. Then delete everything unwanted.
Once you have updated the title of the webpage, click anywhere in the white text box of the body section, followed by pressing ALT + A on your keyboard. This will highlight or select all within the field. Once the text within the field has been highlighted, make the text white again using the font colour icon.
Finally, select the green tick button to save your work.
IMPORTANT: Ensure that the format and text size is consistent and in line with our company format. Use the settings in the picture above as a reference.
Adding the new enrolment link to the body of the webpage
Next, repeat the process of exposing the layers, only this time, expose the layers within the Body section. As you previously did, select the down arrow on the blue bar titled ‘Body‘. This will cause the webpage editor to display the layer hidden beneath. Keep selecting the down arrow on each new layer until you reach the black layer. The black layer contains the text visible to the student on the website.
Once you see the black layer titled ‘Body‘, click the gear icon to open the editor.
Next, highlight all the text found within the text field.
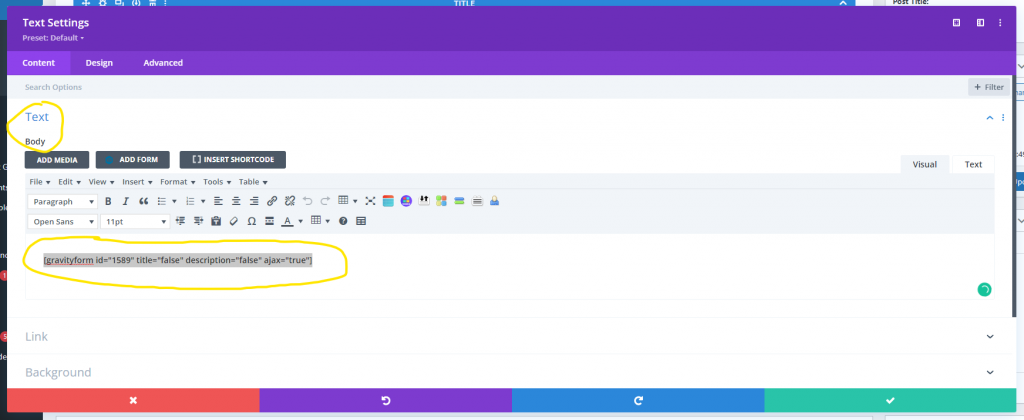
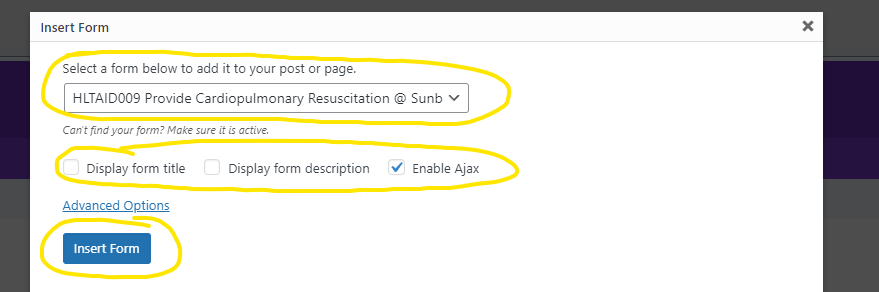
- Select the button titled ‘Add Form‘
- Next, using the dropdown arrow, select the enrolment form you previously created.
- Untick the checkboxes titled ‘Display form title‘ AND ‘Display form description‘
- Tick the checkbox titled ‘Enable Ajax‘
- Click the button titled ‘Insert Form‘
- Click the green tick button to save your work
Final webpage adjustments
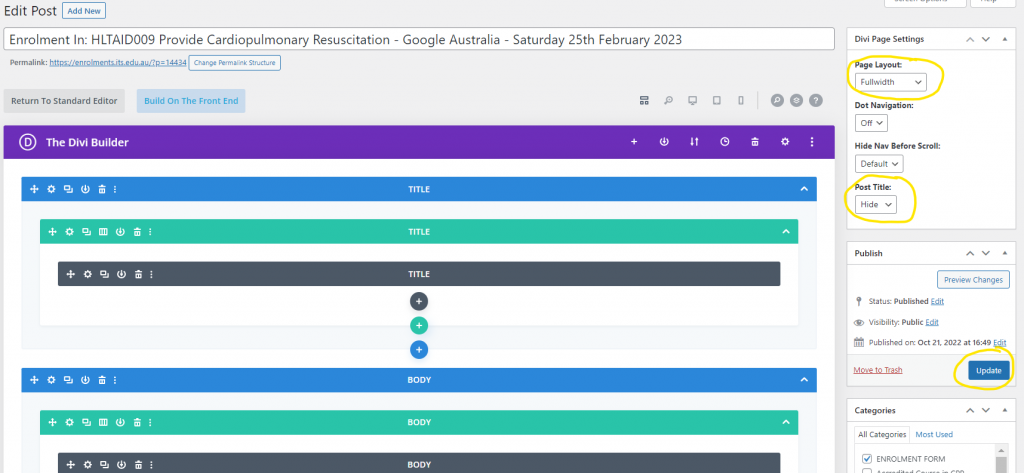
Locate the ‘Divi Page Settings‘ menu in the right-hand side of the screen. Change the following parameters.
- Page Layout – Fullwidth
- Post Title – Hide
Finally, click the blue ‘Update‘ button.
Success! You have now created an Enrolment Link that can be shared with the student/client.
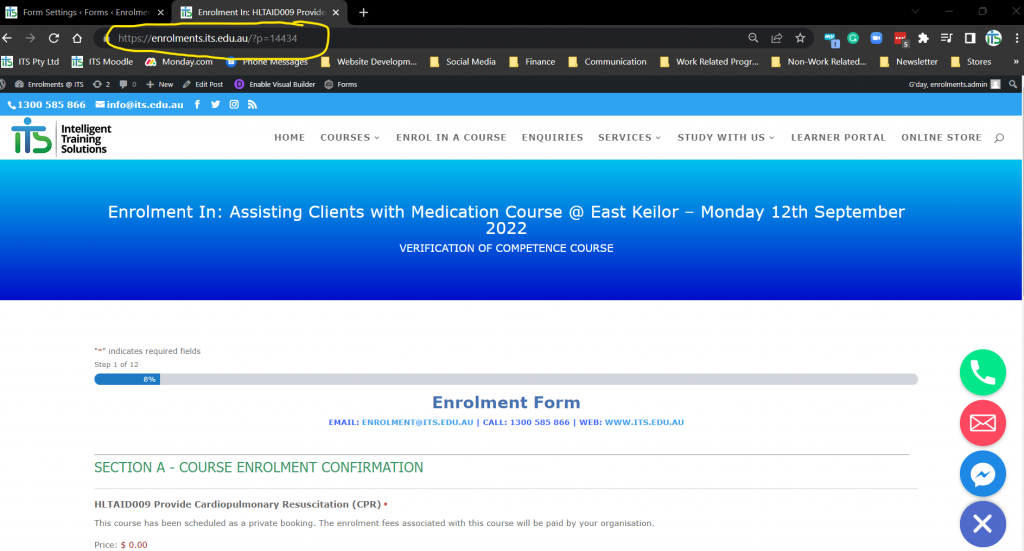
To view your work, click on the blue permalink. This will force the webpage to refresh and display the newly created enrolment form and link.

Once the webpage is open, simply copy down the URL located in the address bar of your web browser.
For information on how to add your newly created enrolment link to the Intelligent Training Solutions website for students to access, view the procedure titled ‘Adding an enrolment link to the I.T.S website‘.