
OP-GDL-02 – Assessment Correction (Marking) Guideline
| Effective Date: | August 2024 | Review Date: | As Required |
| Document Status: | PUBLISHED | Original Version: | 2024.1 |
| Authorised by: | Chief Executive Officer | Document Owner: | Alexander Mueller |
WARNING! – UNCONTROLLED WHEN PRINTED! – THE ORIGINAL/LATEST/CURRENT VERSION OF THIS DOCUMENT IS KEPT IN THE I.T.S POLICY AND PROCEDURES MANUAL LOCATED IN THE STAFF PORTAL.
01. OBJECTIVE
The objective of this guideline is to establish a standardised procedure for correcting and reporting on assessments within qualification courses, including the Car and Heavy Vehicle Driving Instructors courses.
This guideline aims to ensure consistency, accuracy, and efficiency in the management of student assessments and outcomes, facilitating clear communication, effective record-keeping, and compliance with regulatory requirements. By standardising these processes, we seek to enable seamless access to critical information for auditing, student support, AVETMISS, NCVER, ASQA reporting, and other essential functions across the organisation.
02. SCOPE
This guideline outlines the procedures for staff responsible for correcting assessments at Intelligent Training Solutions. It applies to all trainers and assessors, student support officers, administration staff involved in reporting, and course coordinators overseeing the implementation of these processes. This guideline ensures that all relevant personnel adhere to standardised practices for assessment correction and reporting.
03. DEFINITIONS
To be up-dated
04. GUIDELINE STATEMENT
- Assessments must be corrected within 30 days from receipt of the student’s submission.
- The support email address is a SHARED email account, so please be careful when deleting emails.
- Ensure that you follow the procedure below for correcting any assessments, for example: Car Driving Instructor and Heavy Vehicle Driving Instructor assessments.
05. REQUIRED PROGRAM ACCESS
- support@its.edu.au email address
- com – Required Board: ‘Active CDI/HVDI Students – Progress Overview’.
- T.S Learner Portal.
- T.S Servers (Daintree Server) – Access to the Master Assessments.
- Net – Student Management Software.
06. BACKGROUND INFORMATION
06.1 – MONDAY.COM
This platform serves as the primary point of reference for our team. Monday.com provides a collaborative and accessible space where trainers, assessors, and support personnel can record student observations, feedback, assessment outcomes, and other relevant information.
Each student’s profile on Monday.com includes essential contact details such as email addresses, mobile numbers, class codes, and more. Specific fields within a student’s profile, such as the date their file was last reviewed, trigger automated reminders to key personnel. These reminders notify team members when a student has been inactive for over 45 days or when a course is nearing its expiration date (within 30 days). This system enables our team to proactively reach out to students as needed.
Access to Monday.com and its various boards (sub-folders) is managed by the Chief Executive Officer and is restricted based on necessity, ensuring that only those who need access can view or modify the information.
06.2 – I.T.S SERVER
The I.T.S. servers are privately owned and maintained by the Chief Executive Officer, housed in a secure location that is inaccessible to the public and I.T.S. students. Our servers, named DAINTREE, MORTON, and AITUTAKI, store the files and folders of various record-keeping systems within Intelligent Training Solutions. This includes files that serve as Evidence of Participation (E.O.P) for student records, a critical audit requirement for Registered Training Organisations (RTOs).
Access to the I.T.S. servers and the associated record-keeping systems is tightly controlled by the Chief Executive Officer and is restricted to personnel based on necessity.
06.3 – WISE.NET
Wise.Net is the student management software used by Intelligent Training Solutions for recording and reporting student qualifications, progress, and assessment outcomes to the relevant government departments. Additionally, this software is used for issuing student awards, including Certificates, Statements of Attainment, and Statements of Results.
Access to Wise.Net is strictly limited to the administrative team. Trainers and assessors and any other personnel outside of the Riddells Creek office do not have access to this software.
06.4 – I.T.S LEARNER PORTAL
The I.T.S. Learner Portal is a Moodle-based Learning Management System (LMS) that has been customized for use by Intelligent Training Solutions. This platform enables trainers and assessors to deliver courses online, allowing students to complete their course requirements remotely.
Access to the I.T.S. Learner Portal is managed by the administrative and enrolment teams.
06.5 – STUDENT SUPPORT EMAIL
This is a shared email address used by all team members within the Transport & Logistics department. All student assessment submissions are directed to this email, ensuring that the entire team has access to incoming and completed assessments.
07. CORRECTING PROCEDURE FOR ASSESSMENTS & ASSIGNMENTS
07.1 – Preparation:
Ensure you are logged into the following systems:
-
- T.S Learner Portal
- com
- T.S Server (DAINTREE)
07.2 Begin with the Oldest Submission:
- Start with the oldest assessment submission in the Support email inbox to ensure no student waits longer than 30 days for their submission to be reviewed.
07.3 Access the Submission:
- Open the submission email and click on the blue link within it. This link will take you to the relevant course and unit of competence where the student’s assessment submission is located.

07.4 Locate the Student’s Work:
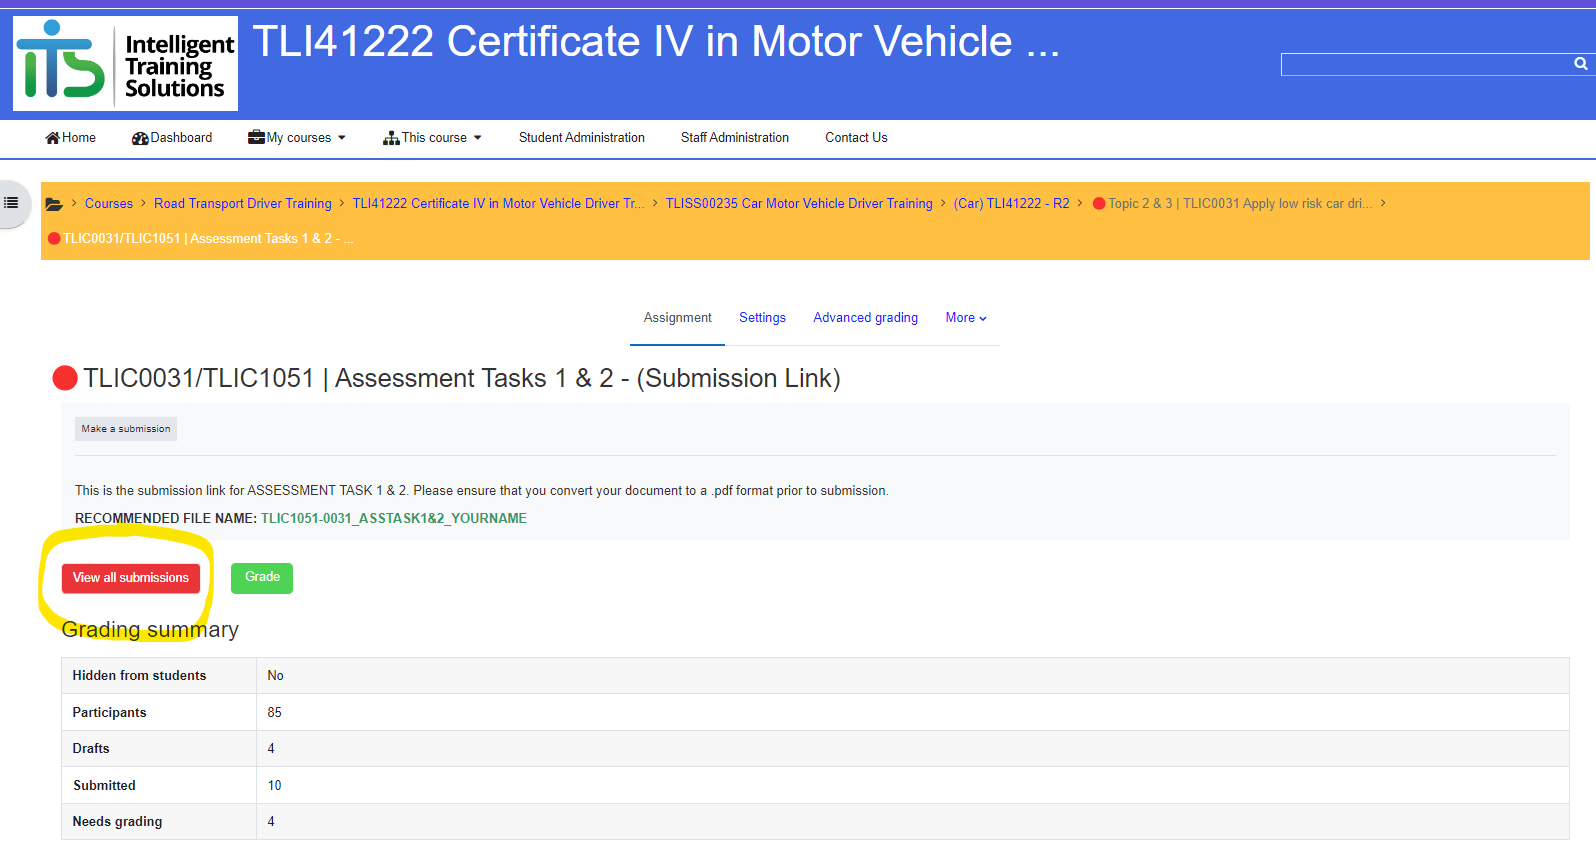
- Click on ‘View All Submissions.’
- Use the ‘first name’ and ‘last name’ filter to quickly locate the student. For example: ‘Krishan Kant.’
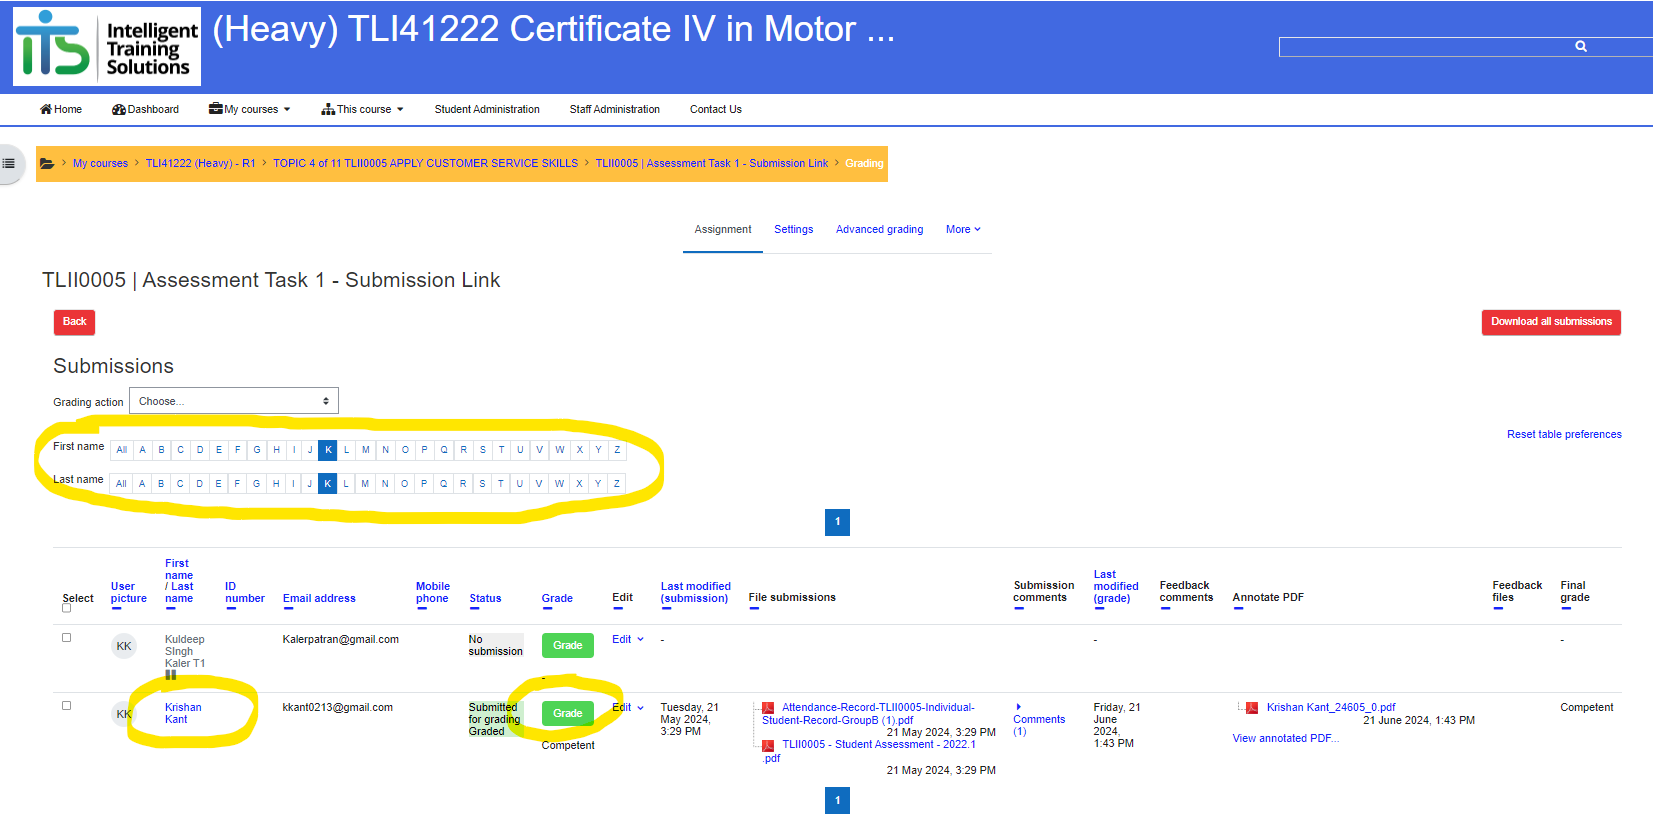
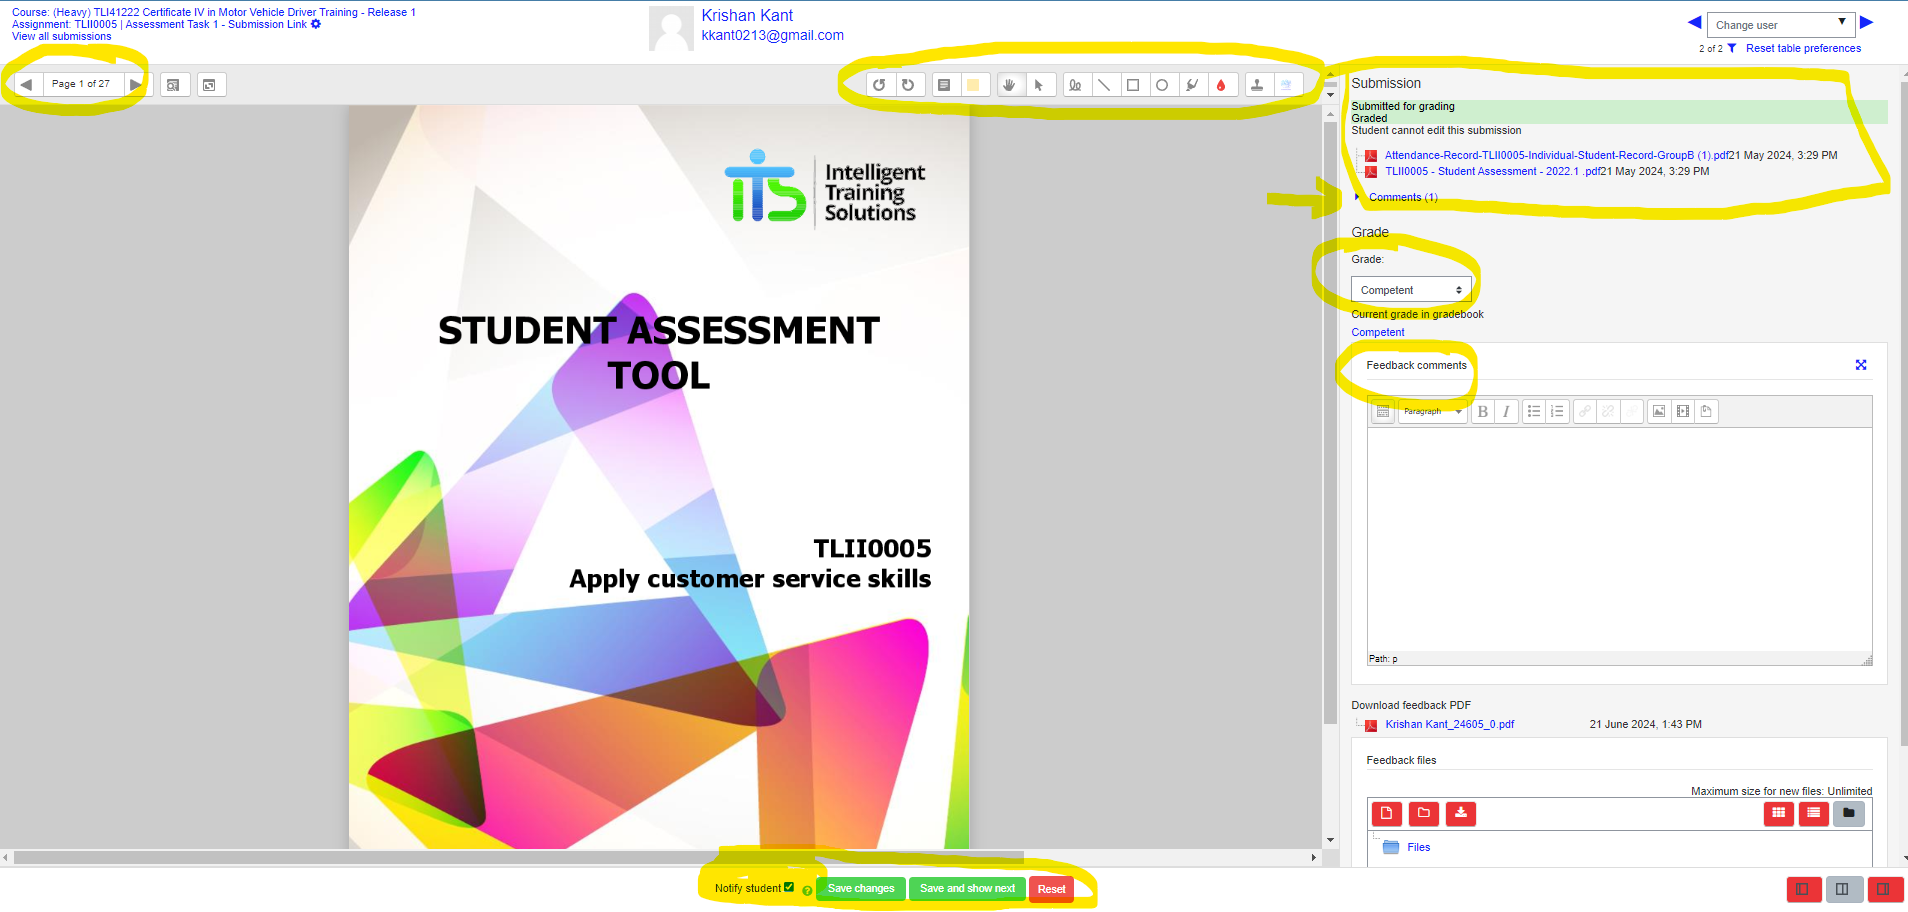
- Click the green ‘GRADE’ button next to the student’s name to open Moodle’s PDF annotator, allowing you to grade and comment on the student’s submission.
07.5 Correct the Assessment:
- Use the left and right arrows to navigate through the student’s work.
- Provide feedback in the comments section.
- Assign a grade using the Grade dropdown box or, if relevant, enter a percentage grade.
- Review any previous feedback/comments by clicking on the ‘Comment’ link if available or by searching through the ‘Feedback comments’ box.
07.6 Save and Notify the Student:
- After grading and signing the assessment, ensure the ‘Notify Student’ checkbox is selected.
- Click the green ‘Save Changes’ button.
- IMPORTANT: Remind the student they have 7 to 14 days to resubmit their work before a final result is entered. The exact timeframe can be found in the assessment task instructions, but generally, 14 days are allowed for resubmission.
- IMPORTANT: Use the copy-and-paste feature to duplicate your feedback into the student’s profile on Monday.com. This is crucial for enabling the administration team and other trainers/assessors to assist students when they inquire about the status of their work or request feedback. Efficiently providing this information is vital, especially during audits
07.7 Download and Upload the Corrected Assessment
- Navigate back to the submissions page by clicking the submission link in the top left corner.
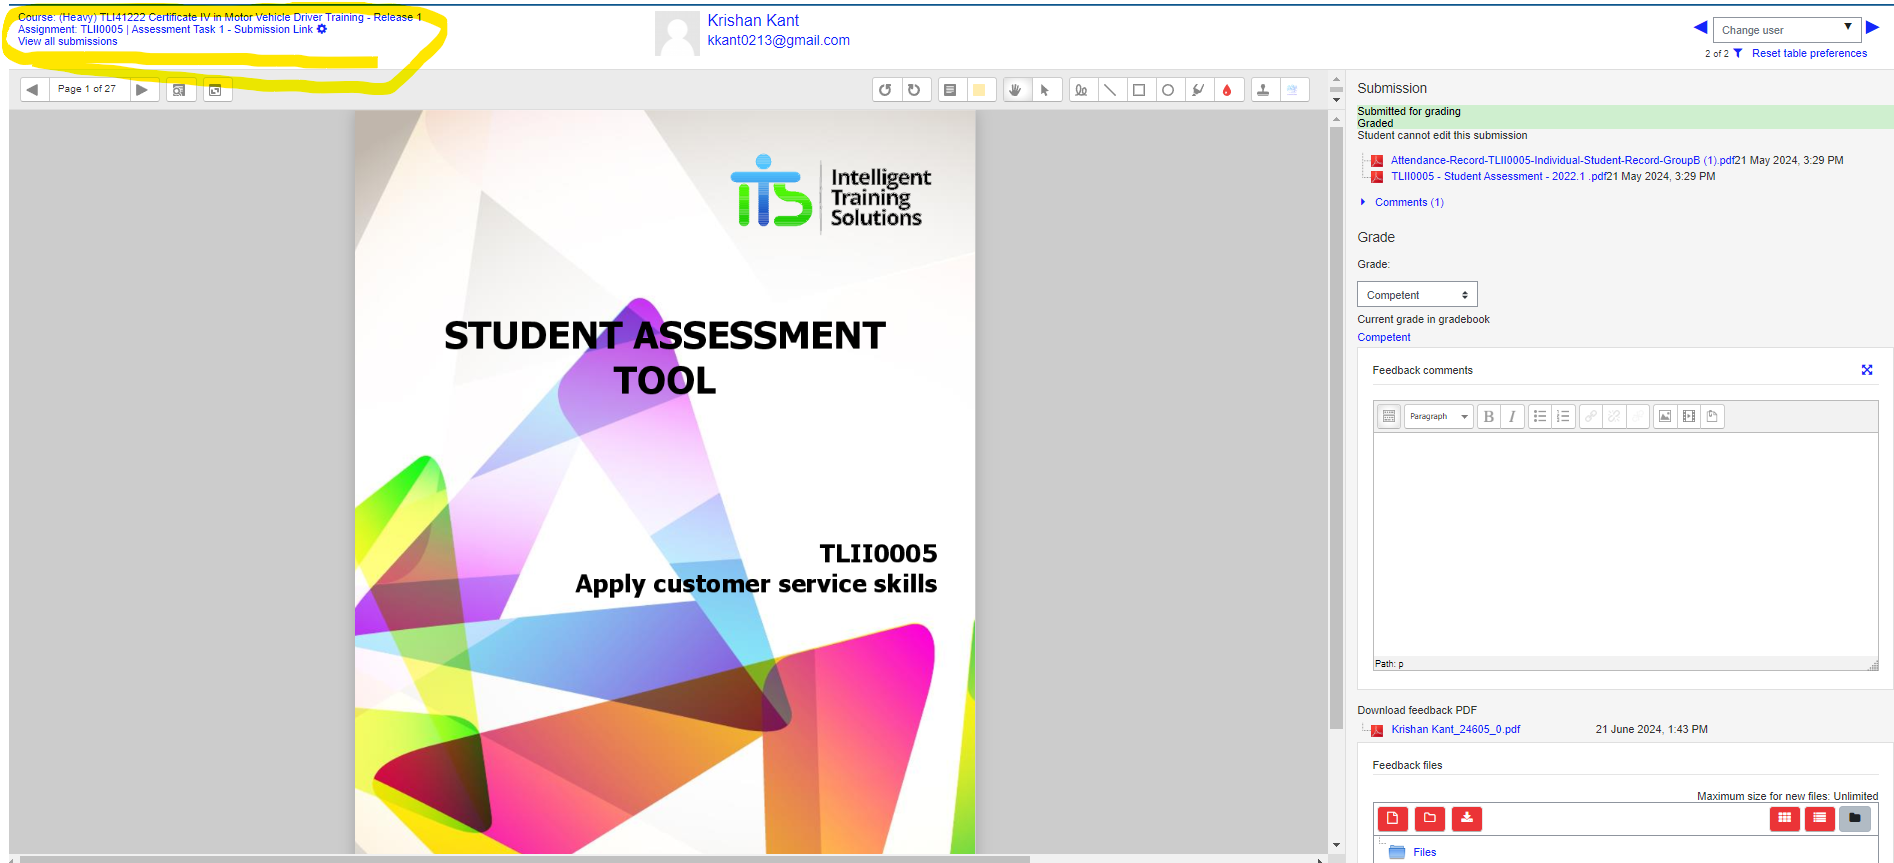
- Locate the student’s submission again as described in step 4.
- Download the ‘Annotated PDF’ file if available, or the ‘file submission’ and save it directly to the student’s assessment folder on the I.T.S server, either on the Reservoir or Riddells Creek servers. If working remotely, download the file to your computer first, then upload it to the I.T.S server using the web browser.
- Note: Uploading files to the I.T.S server can be done in bulk before the end of your shift or immediately after correcting an assessment.
- The procedure for uploading files remotely to the server is outlined below.
- The procedure for naming files is also provided below.
07.8 Next Steps Based on Assessment Outcomes
- Competent: If the student is marked as Competent, follow the procedure for Reporting on Assessment Results.
- Not Yet Competent: If the student is marked as Not Yet Competent, proceed to the procedure for Reverting an Assessment to a DRAFT.
08. REVERTING AN ASSESSMENT TO A DRAFT – PROVIDING STUDENTS WITH A SECOND ATTEMPT
To give a student a second attempt at their assessment, you must revert their previous submission to draft status in the I.T.S Learner Portal. This action allows the student to resubmit their assignment while still providing access to their initial attempt.
- To revert an assessment/assignment to draft, first follow step 4a to locate the assessment submission that needs to be reverted.
- Click on the ‘EDIT’ link associated with the student. A dropdown menu will appear.
- Select the ‘Revert the submission to draft’ option.
At this point, the learner portal will have already notified the student of their assessment results and feedback. By reverting the submission to draft status, the student will be able to revise and resubmit their assessment.
09. PROCEDURE FOR CORRECTING QUIZZES
NOTE: This procedure does not apply to the TLISS00155 Road Safety Skill Set program.
Marking quizzes on the I.T.S Learner Portal involves a slightly different process compared to assessments or assignments, though there are similarities. Follow the steps below when correcting a quiz on the I.T.S Learner Portal.
09.1 Preparation:
- Ensure you are logged into the following programs:
- I.T.S Learner Portal
- Monday.com
- I.T.S Server (DAINTREE SERVER)
09.2 Begin with the Oldest Submission:
- Start with the oldest quiz submission (email) in the Support email inbox to ensure no student waits longer than 30 days for their submission to be corrected.
09.3 Access the Submission:
- Open the submission email and click on the blue link within it. This link will take you to the relevant course and unit of competence where the student’s quiz results can be reviewed.

09.4 Navigate to the Quiz Attempts:
- Click on the blue link titled ‘Attempts’ located above the red “Back to Course” button.
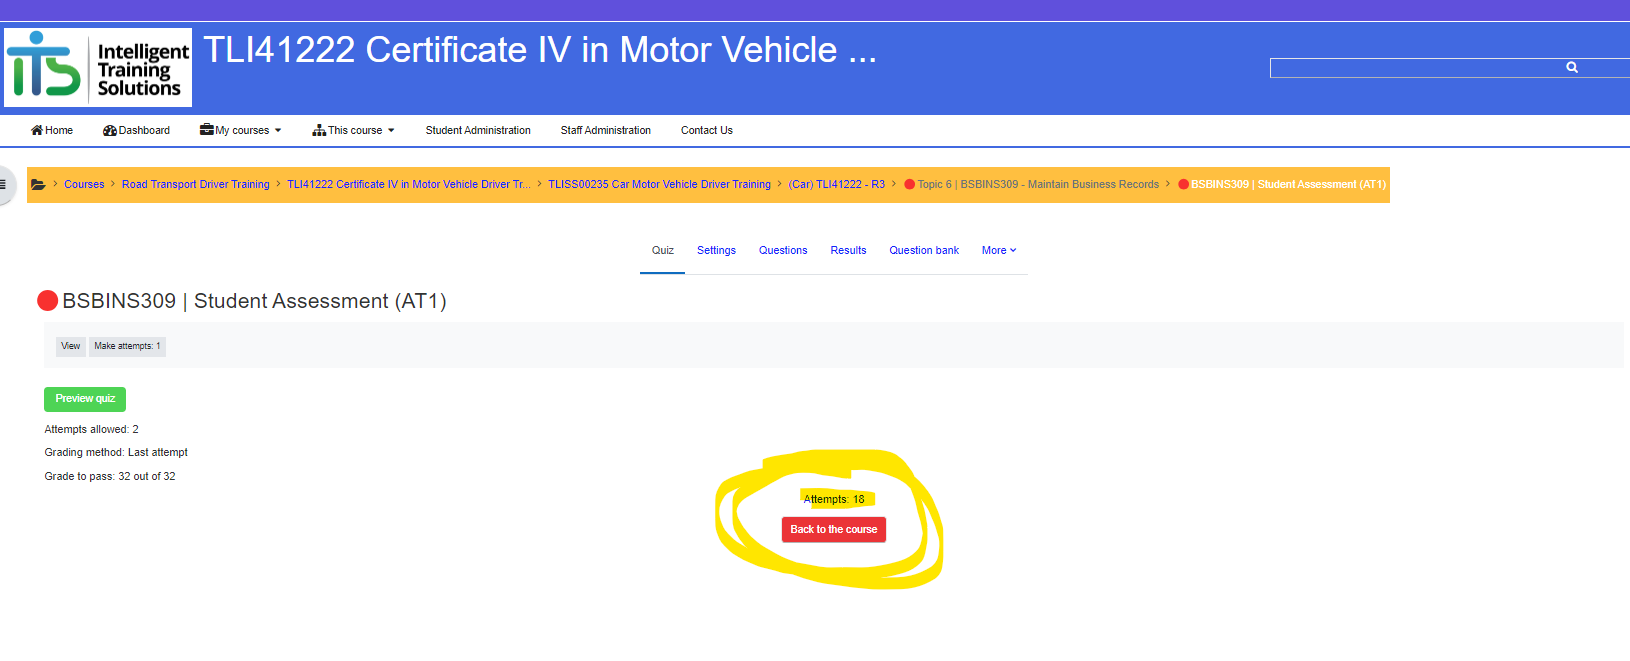
09.5 Locate the Student’s Quiz:
- Use the ‘first name’ and ‘last name’ filter to quickly locate the student. For example: ‘Marc Seow.’
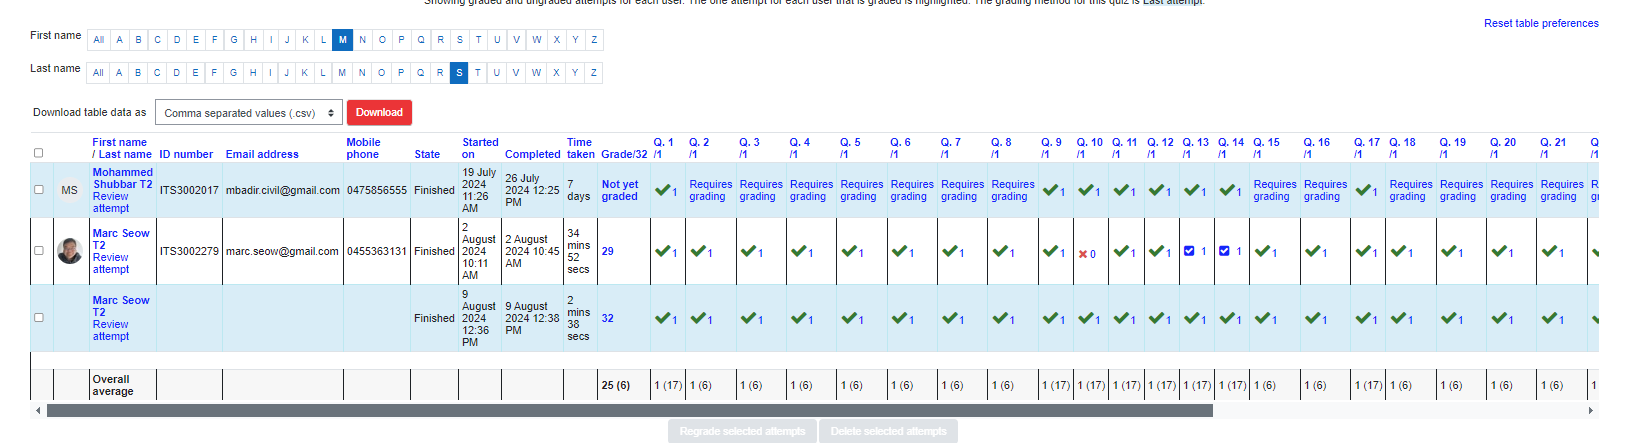
- Click on the blue link titled ‘Review Attempt’ under the student’s name to open the quiz attempt.
09.6 Review Quiz Responses:
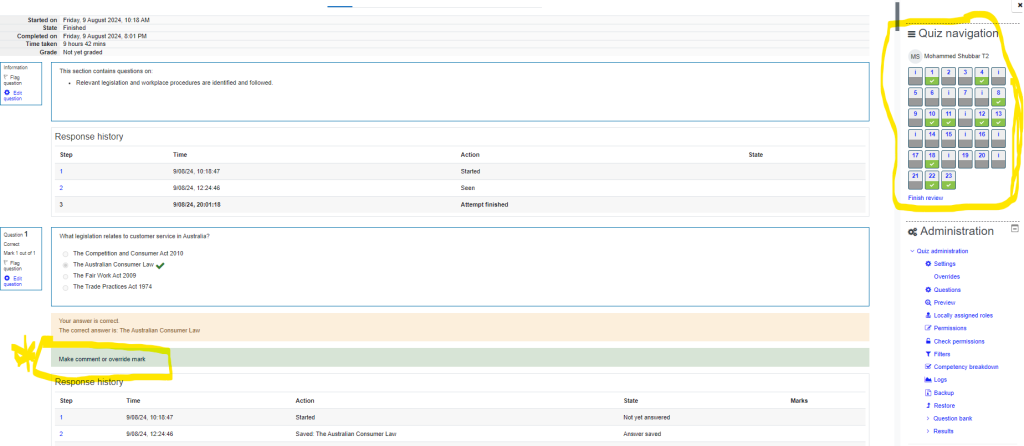
- While many quiz questions are self-correcting, some require manual review. Use the Quiz Navigation menu on the right-hand side of the screen to identify questions that need your attention. These responses will be color-coded.
- Red: Incorrect answer identified by the learner portal (requires review).
- Orange: Partially correct answer identified by the learner portal (requires review).
- Gray: Response that cannot be auto-assessed by the learner portal (requires review).
- Green: Responses that have been self-corrected by the learner portal (no review required).
09.7 Correct Responses:
- To review and mark a question, click on the question number in the Quiz Navigation menu. Use the ‘Make comment or override mark’ link in the green text box to provide feedback or adjust the score.
09.8 Save the Reviewed Quiz:
- After reviewing and marking the quiz, save the results as a PDF. Press ‘CTRL + P’ on your keyboard and follow the prompts to save the page as a PDF document. Use the file naming procedure allocated to student assessments.
09.9 Upload the PDF to the I.T.S Server:
- Save the PDF file directly to the student’s assessment folder on the I.T.S server (Reservoir or Riddells Creek). If working remotely, save the file to your computer first, then upload it to the I.T.S server via the web browser.
- Note: Files can be uploaded to the I.T.S server in bulk at the end of your shift or immediately after correcting an assessment.
- The procedure for remote file uploads is outlined below.
- The procedure for file naming is also provided below.
09.10 Complete the Review:
- Once you’ve saved the file and finished marking the quiz, click the blue link titled ‘Finish Review.
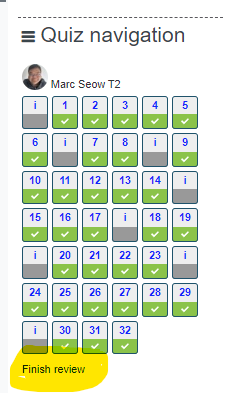
09.11 Determine the Next Steps Based on the Student’s Performance:
- Competent: If the student is marked Competent (full scores), follow the procedure for Reporting on Assessment Results.
- Not Yet Competent: If the student is marked Not Yet Competent (incomplete scores), the learner portal will automatically allow the student a second attempt. You may need to email the student via the messaging app within the learner portal to inform them that they need to review the feedback and re-attempt the quiz.
Exceeded Attempts: If the student has exceeded the allowed number of quiz attempts, consult the course coordinator for further guidance.
10. DELETE PROCESSED EMAILS
After completing any action related to a student’s assessment submission, make sure to DELETE the email containing the submission link, or any other processed email, from the Student Support inbox. This ensures that the email is removed from the inbox of all staff members sharing this account, preventing any duplication of effort.
Note: Exercise caution when deleting items from the Student Support inbox! Once an email is deleted, it cannot be retrieved. However, the student’s assessment will still be available on the I.T.S Learner Portal.
Importance of Deleting Completed Items: It is crucial to delete completed items from the Student Support inbox to help the team monitor the current workload and adjust operating budgets accordingly. Failure to maintain this inbox may result in a request for a formal explanation.
11. FILE NAMING PROCEDURE
11.1 – Creating Version Numbers:
- Use the following format for creating version numbers: <Year.Version Number>.
- Example: 2024.1
- Each time a document is updated for any reason, increment the version number (the number after the decimal point) to the next sequential number (e.g., .1, .2, .3, etc.)
- The year within the version number should always reflect the current year.
11.2 Naming (Creating) Result Sheets:
When preparing a student’s result sheet, follow the procedure below for saving and naming files.
-
Result Sheets for New Students
- Create two folders within the student’s profile on the I.T.S Server:
- ‘Result Sheet WORD’
- ‘Result Sheets PDF’
- Save the new result sheet (MS Word Document) in the ‘Result Sheet WORD’ folder using the following file name format.‘Result Sheet for <Insert Students Name> – <Insert Student ID Number> – <Insert Qualification Code> – <Insert Version Number>’
- Example: ‘Result Sheet for Alex Mueller – ITS000001 – TLI41222 – 2024.1’
- Create two folders within the student’s profile on the I.T.S Server:
11.3 File Naming for Student Assessments:
-
-
-
- When uploading student assessments, assignments, or quizzes to the student’s file on the I.T.S Server, adhere to the following file naming procedure:REASON: All documents used by I.T.S must follow a specific file naming structure to facilitate system indexing and quick searches. Deviating from this structure may cause confusion and delays. 😊
- Download the student’s documents to their Assessments folder within their profile on the I.T.S Server.
- For example: ‘ITS000001 – Alex Mueller/Assessments’
- Save the file using the following format.Assessment documents: ‘<SUBMISSION NUMBER> – <ASSESSMENT TASK NUMBER> – <UNIT CODE> – <OUTCOME RESULT> – <STUDENT NUMBER>’
- For example, ’02 – AT3 – TAEDES412 – COM – ITS000001’
- ‘02’ indicates it is the student’s second, and final, submission.
- ‘AT3’ indicates that this document pertains to the third assessment task in the unit.
- ‘TAEDES412’ represents the unit code.
- ‘COM’ reflects the outcome result of the unit (result codes can be found on the result sheets).
- ‘ITS000001’ refers to the student’s ID number with I.T.S and links the document to the student.
- For example, ’02 – AT3 – TAEDES412 – COM – ITS000001’
-
-
12. REPORTING ON ASSESSMENT RESULTS (OUTCOMES)
Reporting on students’ assessment outcomes is a mandatory task that must be completed promptly. There are three key areas that need to be updated with a student’s assessment outcome:
- Monday.com: The student’s outcome must be updated by the trainer, assessor, or student support team on Monday.com.
- Student Result Sheet: The result sheet should be updated by the trainer, assessor, or student support team and submitted to the office. A copy must also be provided to the administration team via Monday.com.
- Net: The administration team is responsible for updating the student’s outcome in Wise.Net and reporting these results to the NCVER via the AVETMISS reporting procedure.
REPORTING ON MONDAY.COM
Accurately updating student information on Monday.com is crucial, as it enables the administration team and other trainers/assessors to efficiently respond to student inquiries regarding the status of their work or to provide feedback. Searching for information through the I.T.S servers or the student’s learner portal is not efficient and can slow down the process, particularly during audits.
While it’s not the primary role of the administration team or other staff members to provide student support, our team collaborates to assist by filtering student calls, answering basic inquiries, and guiding students on how to proceed with their courses. This support is only possible if detailed notes, feedback, and the student’s file are consistently updated on Monday.com.
Steps to Follow:
Tip: For optimal viewing of the student’s record on Monday.com, use a dual-monitor setup. If you only have a single monitor, remember to scroll through the student’s profile to ensure you don’t miss any hidden information.
- Navigate to the Student Profile:
- Each student will have a separate profile for every course they are enrolled in. For example, if a student is enrolled in two courses, they will have two profiles on Monday.com.
- To find the student’s profile, go to the board titled ‘Active CDI/HVDI Students – Progress Overview,’ then use the search bar to enter the student’s name.
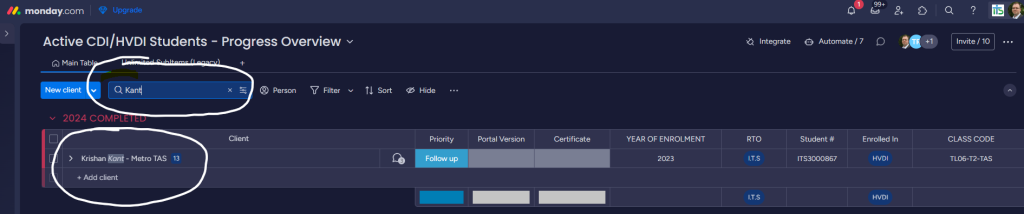
- Expand the Student File:
- Click the ‘^’ link next to the student’s name to expand and retract their profile.
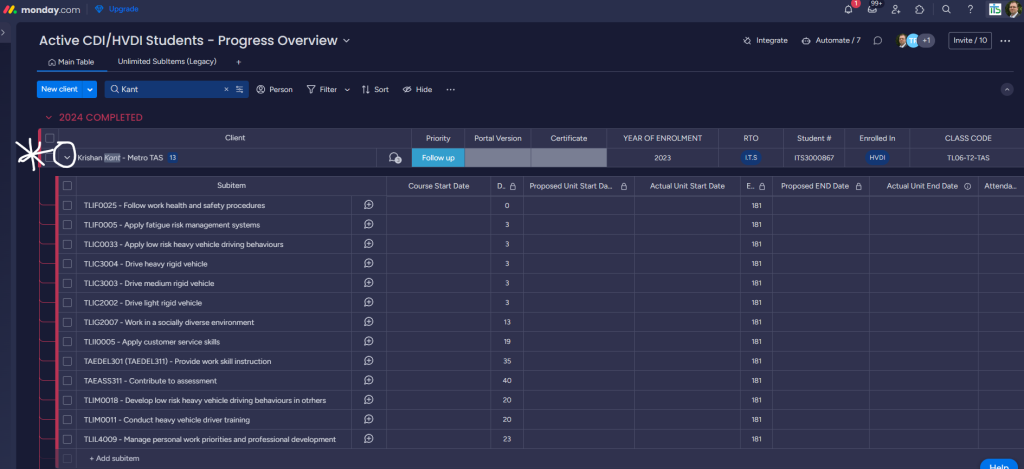
- Click the ‘^’ link next to the student’s name to expand and retract their profile.
- Verify the Enrolled Units:
- You should only see the units the student is enrolled in. If additional units are listed (or missing), contact the administration team immediately to correct the error.
- Review and Update the Student’s Profile:
-
- Before making any changes, review the entire profile to ensure all relevant fields are updated. The following fields should be checked and updated each time you work on the student’s profile.
- Priority Status: Reset to Gray tone or ‘normal’ if the issues have been addressed.
- Portal Version Number: Check and update if necessary.
- Status Field: Review and update as needed.
- Course Expiry Date: Ensure this is correct.
- Student File Last Checked Field: Reset this to today’s date.
- Comments Section: There are two main comment areas.
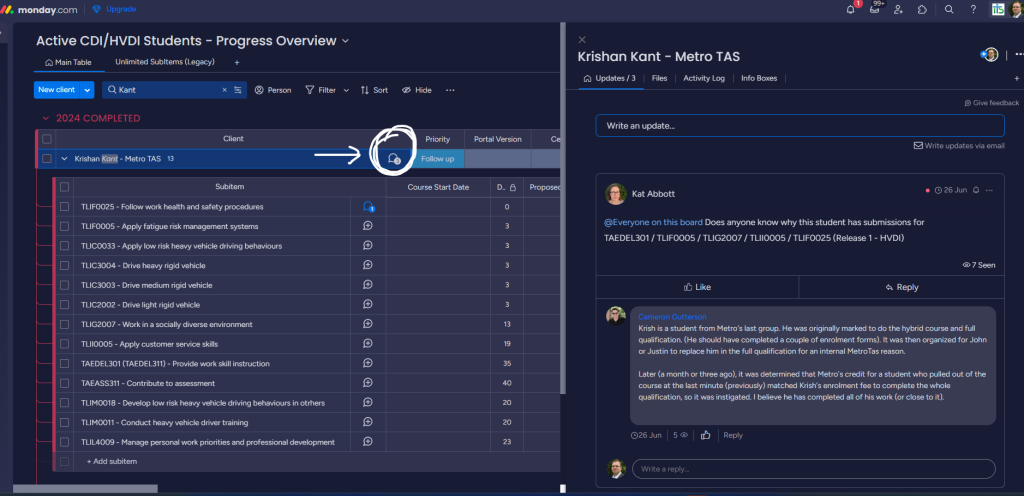
- Main Comment Field: Located next to the student’s name (speech bubble icon). This field contains general information such as documented student calls, complaints (student or trainer), trainer observations, and outstanding invoices. To tag a staff member, use the ‘@’ symbol followed by their name. Example: @alex
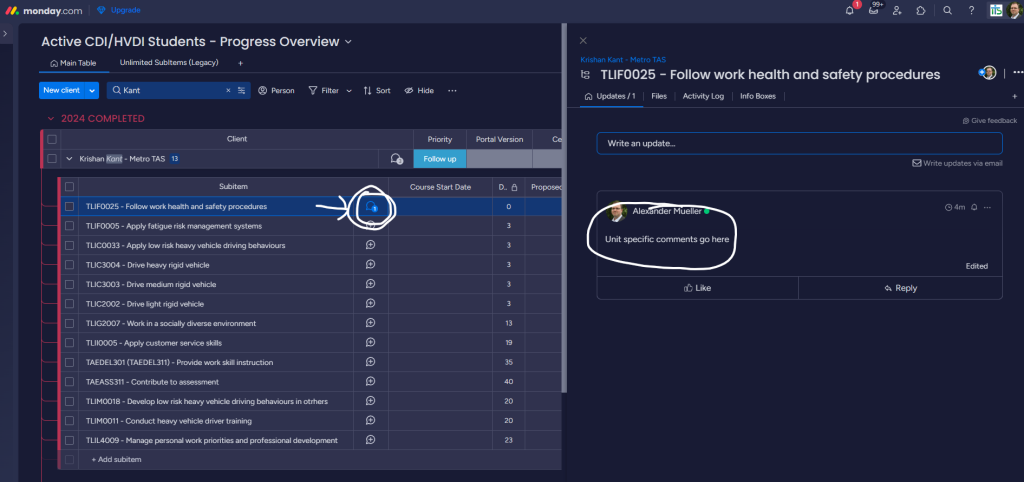
- Unit-Specific Comment Field: Located next to each unit of competency (speech bubble icon). This field contains unit-specific information like assessment feedback, student comments, and staff observations. Use the ‘@’ symbol to tag staff members for their attention.
- Main Comment Field: Located next to the student’s name (speech bubble icon). This field contains general information such as documented student calls, complaints (student or trainer), trainer observations, and outstanding invoices. To tag a staff member, use the ‘@’ symbol followed by their name. Example: @alex
- Before making any changes, review the entire profile to ensure all relevant fields are updated. The following fields should be checked and updated each time you work on the student’s profile.
-
- Update Each Unit:
- Unit Comments (Compulsory): Paste any feedback provided to the student when correcting their unit assessment.
- Actual Unit Start Date (Compulsory): Match this date with the student’s attendance register start date or the date from the first piece of EOP.
- Actual Unit End Date (Compulsory): Update this field only when the student has been marked as Competent for that unit. Ensure the date matches the unit end date on the result sheet.
- Attendance Record Submitted (Compulsory): Mark this as complete once a completed attendance record is received, is correctly filed, and has been uploaded in the student profile on the I.T.S server.
LINK: Attendance Record Compliance - Assessment Task Status (Compulsory): This column represents the number of assessment tasks the student must complete for each unit of competency. Mark the status of each task appropriately (e.g., Re-submission, Competent, NYC, Not Submitted, or CT).
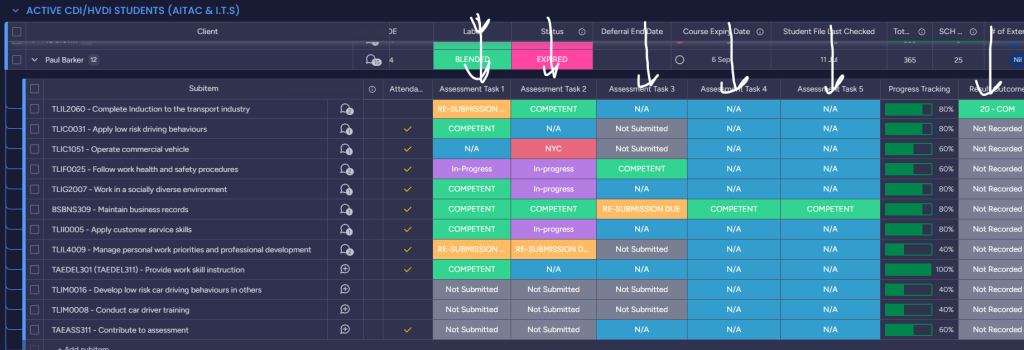
- Do not delete any Assessment Task fields as this will impact the entire board!
- Result Outcome Field (Compulsory): Update this field only after all Assessment Task fields have been marked as Competent for a unit.
- A student cannot be marked as Competent without successfully completing all unit requirements.
- Result Status Field: (CHANGED) This field is used by the administration staff to record when the Students’ results have been uploaded to Wise.Net.
- SCH (Student Contact Hours) Claimed (Recommended): Once the Result Outcome is marked as Competent, update the SCH field with the nominal hours achieved. This field is especially important for government-funded students.
- Date Results Entered (Compulsory): Enter the date when the result sheet was updated/submitted to the administration team.
- This provides us with a timeline record.
- Result Sheet Submitted (Recommended): Use this as a progress marker to indicate that the results for a unit have been submitted to the administration team. (Timeline record).
- E.O.P Field (Compulsory): This field indicates that we have Evidence of Participation (EOP) on file within the I.T.S servers for the student’s result/outcome. (Check Point Record).
REPORTING ON A STUDENT’S RESULTS / OUTCOMES USING A RESULT SHEET
NOTE: The following reporting procedure for ‘Result Sheets’ does not apply to AITAC students. For AITAC’s reporting procedure, please refer to your supervisor.
A student result sheet is the official record of the student’s progress in their qualification/course. This differs from tracking a student’s progress through individual units such as seen on Monday.com.
A result sheet must only be completed by the unit assessor or the course student support officer (who is also qualified as a course assessor). A unit of competence can only be marked as Competent once all assessment requirements for the unit have been met (refer to the recording procedure on Monday.com/Assessment Tasks field).
Procedure for Completing a Result Sheet:
- Create a New Result Sheet:
- For all new students (students who have not had a result outcome reported previously), create a new result sheet. Result sheet templates can be found on the I.T.S Server at the following locations:
- Car Driving Instructor Qualification: \\DAINTREE SERVER\TEMPLATES – Attendance Records and Result Sheets\Result Sheets.
- Heavy Vehicle Instructor Qualification: \\DAINTREE SERVER\TEMPLATES – Attendance Records and Result Sheets\Result Sheets
- For all new students (students who have not had a result outcome reported previously), create a new result sheet. Result sheet templates can be found on the I.T.S Server at the following locations:
- Save the New Result Sheet:
- Open the appropriate template and save a new copy of the result sheet into the student’s profile on the server. Ensure you follow the file naming procedure when saving documents.
- Update the Result Sheet:
- Go through the entire result sheet and update the following fields:
- Student name.
- Course code and title.
- Student number.
- Class code
- Student start date
- Enrolment status
- Training completed in. – Manual or Auto Vehicle
- Go through the entire result sheet and update the following fields:
- Complete the Results Table (in RED TEXT):
- For each unit completed, update the following fields:
- Unit start date (must match the student attendance record and the Monday.com record).
- Unit end date (must match the student attendance record and the Monday.com record.)
- Result code/outcome (must match the student record on Monday.com).
- E.O.P (Evidence of Participation) – E.O.P must be on file to report the result.
- Assessor name (the person who corrected the student’s work).
- Course coordinator signature (can also be the signature of the person completing the result sheet).
- Date (the date the result sheet was last updated).
- For each unit completed, update the following fields:
- Save as PDF:
- Once completed, print the document as a PDF and save it in the folder titled ‘Result Sheets PDF,’ using the same file name as the Word Document.
- Update Monday.com:
- Go to Monday.com and start a new comment in the main comments section of the student’s profile.
- Go to Monday.com and start a new comment in the main comments section of the student’s profile.
- Notify the Administration Team:
- Tag the appropriate person (e.g., @Tarcey) within the administration team and inform them that an updated result sheet is available for processing on Wise.Net. You may also upload a copy of the latest result sheet in your comment.
Procedure for Completing a Result Sheet for an Existing Student:
- Locate and Open the Last Updated Result Sheet:
- Find and open the student’s last updated result sheet from the folder titled ‘Result Sheets WORD.’ It will have the highest sequential version number (e.g., 2024.4).

- Find and open the student’s last updated result sheet from the folder titled ‘Result Sheets WORD.’ It will have the highest sequential version number (e.g., 2024.4).
- Save with a New Version Number:
- Save the file using a new version number (e.g., 2024.5)
- Update the Result Sheet:
- Review the entire result sheet and update any fields that may have changed since the last update:
- Student name.
- Course code and title.
- Student number.
- Class code
- Student start date
- Enrolment status
- Training completed in. – Manual or auto vehicle.
- Review the entire result sheet and update any fields that may have changed since the last update:
- Update Results Table:
- Highlight any RED text in the results table and change the text colour to black. This ensures the administration team can clearly identify new results that need to be entered.
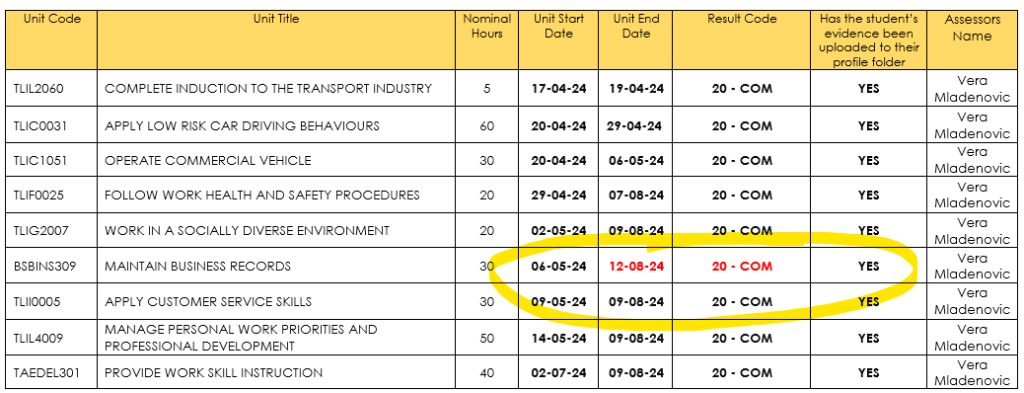
- For each newly completed unit, update the following fields in RED TEXT:
- Unit start date (must match the student attendance record and the Monday.com record).
- Unit end date (must match the student attendance record and the Monday.com record).
- Result code/outcome (must match the student record on Monday.com).
- E.O.P (Evidence of Participation) – E.O.P must be on file to report the result.
- Assessor name (the person who corrected the student’s work).
- Course coordinator signature (can also be the signature of the person completing the result sheet).
- Date (the date the result sheet was last updated).
- Highlight any RED text in the results table and change the text colour to black. This ensures the administration team can clearly identify new results that need to be entered.
- Save as PDF:
- Once completed, print the document as a PDF and save it in the folder titled ‘Result Sheets PDF,’ using the same file name as the Word Document.
- Update Monday.com:
- Go to Monday.com and start a new comment in the main comments section of the student’s profile.
- Notify the Administration Team:
- Tag the appropriate person (e.g., @Tracey) within the administration team and inform them that an updated result sheet is available for processing on Wise.Net. You may also upload a copy of the latest result sheet in your comment.
Procedure for Recording Credit Transfers on a Result Sheet.
26/08/2024 – To be updated…
Procedure for Recording RPL (Recognition of Prior Learning) on a Result Sheet
26/08/2024 – To be updated…
13. UPLOADING FILES REMOTELY TO THE I.T.S SERVERS
26/08/2024 – To be updated…
14. TROUBLESHOOTING
- Email Submission Links Do Not Open the Student’s Assessment or Quiz Attempts:
- If a submission link doesn’t direct you to the student’s assessment or quiz, it may be because the student’s course has expired or been suspended on the I.T.S Learner Portal (Moodle).
- To access the student’s work, you will need to temporarily set their enrolment status to ‘ACTIVE’ within the I.T.S Learner Portal. Remember to SUSPEND their access once you are finished with their file.
- Fixing the Issue of a Student Being Unable to Re-Attempt a Quiz Due to Exceeding the Allowed Number of Attempts:
- This issue may occur if a student has attempted the quiz multiple times without waiting for an assessor to correct their previous submissions. To resolve this, contact the course coordinator or delete the students’ FIRST quiz attempt to allow an additional attempt if appropriate.
15. RESPONSIBILITY
- Chief Executive Officer: The Chief Executive Officer is responsible for the overall maintenance and implementation of this guideline, ensuring it remains current and effective.
- General Manager (Training Manager): The General Manager is responsible for ensuring that all trainers, assessors, and student support staff adhere to the guidelines. This includes overseeing the application of the guidelines in daily operations and addressing any issues related to non-compliance.
- Administration Team: The administration team is responsible for verifying compliance with these guidelines by trainers, assessors, and student support staff. They are required to report any instances of non-compliance directly to the General Manager and Chief Executive Officer.
- Trainers, Assessors, and Student Support Staff: Trainers, assessors, and student support staff are responsible for strictly adhering to these guidelines in all relevant activities, ensuring consistency and accuracy in the assessment correction and reporting process.
16. GUIDELINE NOTES AND EXPLANATIONS
Nil
17. GUIDELINE APPROVAL AND PUBLICATION
These guidelines have been approved for publication by the Company Director and Chief Executive Officer, Alexander Mueller.
 |
SIGNATURE | DATE: 19/08/2024
Revision History
POLICY DOCUMENTATION REGISTER
| REVISION | DATE | RELEASE VERSION | DESCRIPTION OF MODIFICATION |
| 1 | 19/08/2024 | 2024.DRAFT |
|
| 2 | 26/08/2024 | 2024.1 |
|
| 3 | 13/12/2024 | 2024.1 |
|