
Ninja Tables – Add/Modify/Export/Import
SUPERSEDED: Please refer to the SOP – Creating a Public Enrolment Link Using CLAUDE AI – This SOP should only be used if completing an enrolment link manually
NOTE: PLEASE ENSURE THAT YOU ARE LOGGED IN TO THE WEBSITE DASHBOARD (BACKEND) BEFORE PROCEEDING WITH THESE STEPS.
Creating a new Ninja Table
In 95% of the cases, creating a new Ninja table from scratch is not necessary or required. Creating a new table is not difficult and does not require a new skill set; however, it does require proper planning to ensure that a layout is functional, simplistic, clean, and user-friendly. In the event that you require a new, never been seen Ninja Table, please contact the systems administrator for assistance.
Adding (Duplicating) a Ninja Table
Adding a Ninja table to the website is different from creating a new table. In most cases, you can simply duplicate an existing Ninja Table and edit the fields required to suit your intended purpose.
To duplicate (or add) a ninja table, you will need to complete the following steps.
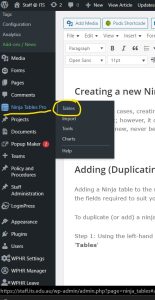
Step 1: Using the left-hand side menu bar, locate the plugin ‘Ninja Table Pro‘. Hover your mouse over this plugin and select the menu item titled ‘Tables‘
Step 2: Use the search field or scroll through the list of available tables to find a table that best reflects (or is closest in design) to the table you require. For example: If you are creating a Ninja Table to list the enrolment links for a course, you will search for a previous version (old version) of the table you require.
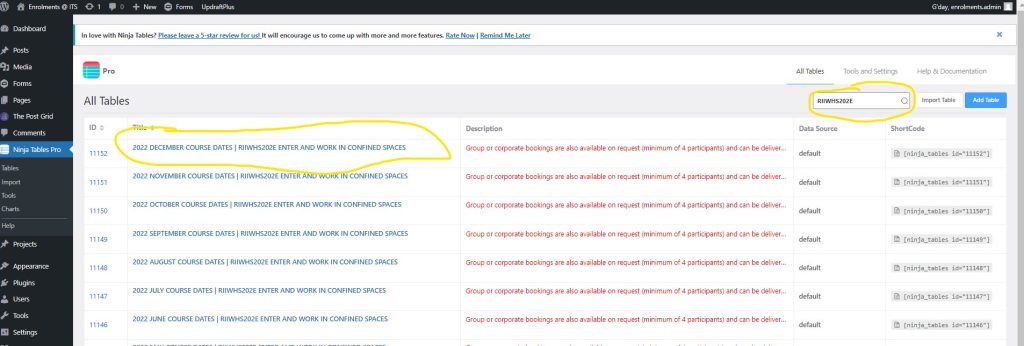
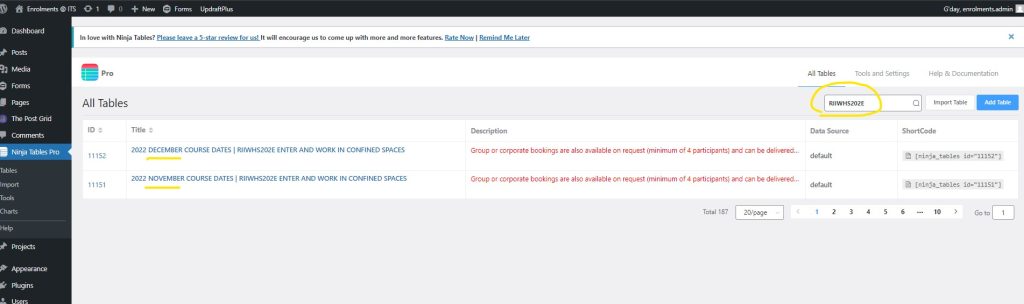
Step 3: (Optional but recommended) – Delete or trash any old and unused Ninja tables you may find. In the example above, you will see that when we searched for a previously used table for the RIIWHS202E course, the search results came back with the entire 2022 year of tables starting in January 2022 through to December 2022. At the time of writing this guide (November 2022) we want to create enrolment link tables for the 2023 calendar year. In this situation, we would delete all RIIWHS202E Ninja tables from January through to October.
REMEMBER! Do not delete the tables for November and December 2022 as they are still currently being used by the website.
Step 4: To create a new Ninja table, hover your mouse over the latest version of the table and click on the ‘Duplicate‘ link. The website will refresh and open in the newly created (Duplicate) link.

Step 5: Edit the table’s title and any other fields relevant to your task.
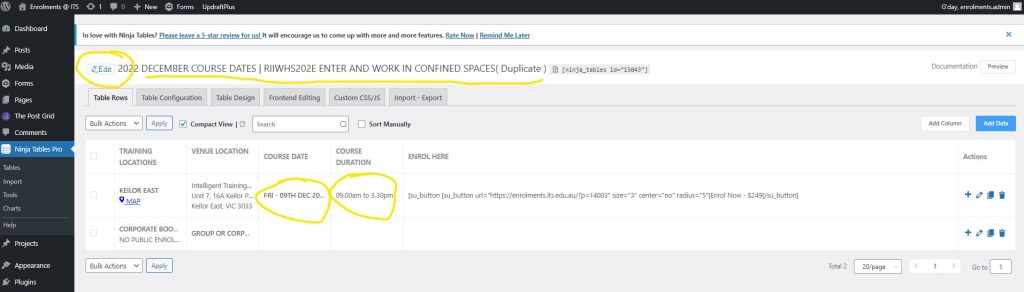
Step 6: Once the table has been updated, copy the table’s shortcode (see picture below) and paste it into the relevant section of the website.
NOTE: The shortcode of a Ninja table created in one website, for example, https://enrolments.its.edu.au, will not work on a different website, for example, https://its.edu.au. To use the table you created with another website, you will need to follow the instructions for Importing and Exporting Ninja tables.
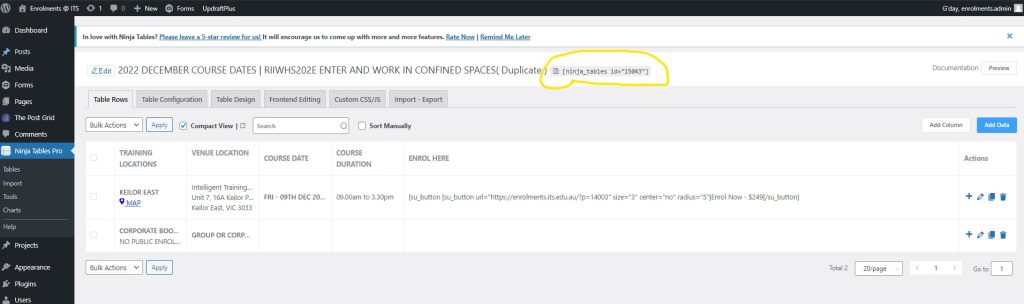
or
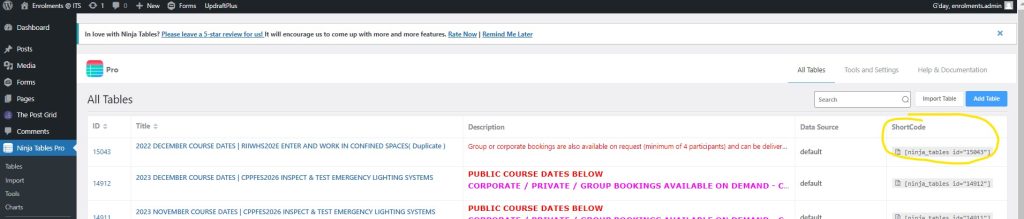
Updating an existing Ninja Table
To easiest way to find and then update an existing Ninja table is by navigating the front end of the website. Simply navigate to the relevant webpage containing the Ninja table that is in need of updates.

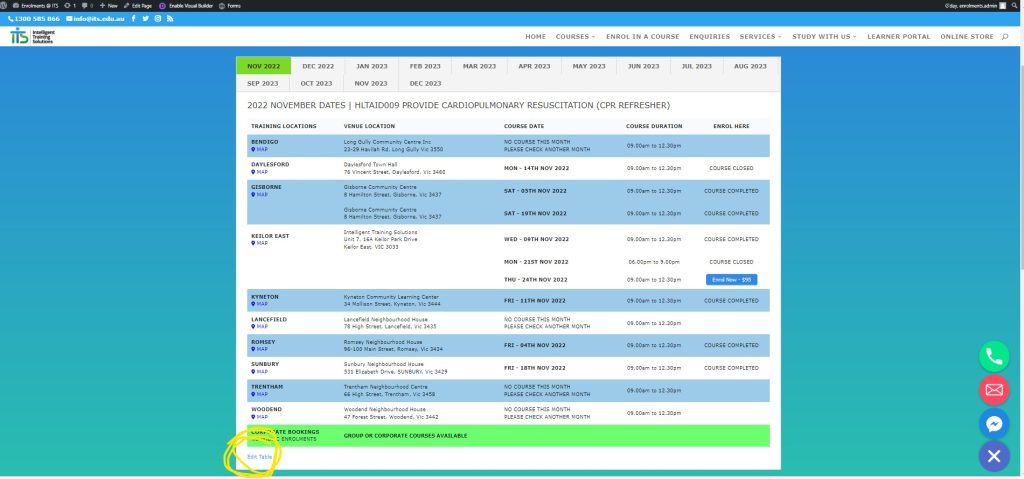
Next, find the required table, then click the ‘Edit Table‘ link found at the bottom of the table.
PLEASE NOTE: You will need to make sure that you are logged in on the website in order to see this blue link.
TIP: If you right-mouse-click on the blue ‘Edit Table‘ link and select the command ‘Open link in new tab‘, you can make any relevant changes to the table without losing the original webpage the table is located in. This will allow you to return to the relevant webpage, press the ‘F5‘ keyboard button or the Refresh button on your web browser, and review the changes you made.
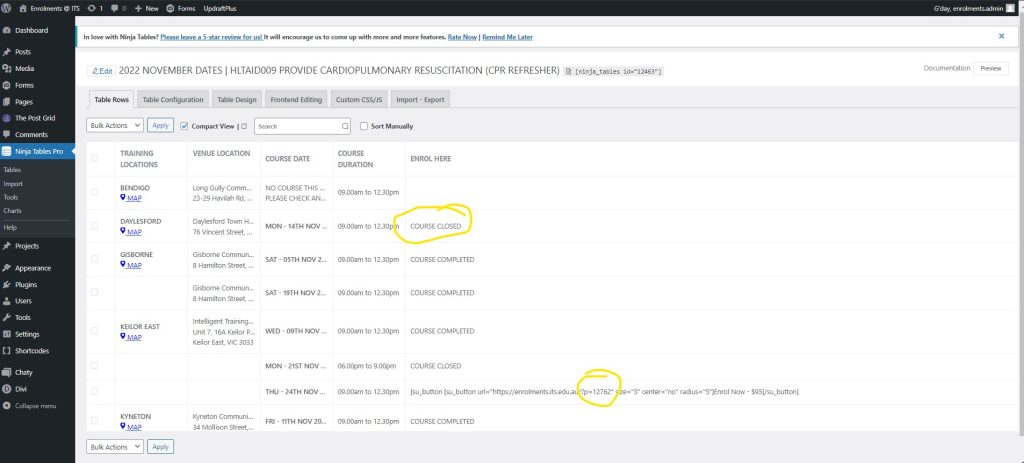
After clicking the blue ‘Edit Table‘ link, make any changes required. Once done, simply click the keyboard ‘TAB‘ button OR mouse click into a different field on the table to save your work.
PLEASE NOTE: Taking the focus away from the field that you are updating will automatically prompt the system to save your work. It is extremely important that you move slowly and take your time when updating fields within a table, as any changes you make are permanent and will be live for the public to see.
Exporting a Ninja Table for use on another Website.
To prepare a Ninja table to be exported, you will need to find and then edit the Ninja table. As with previous steps within this guide, the easiest way to find a Ninja table is by navigating the front end of the website. Navigate to the relevant webpage containing the Ninja table that you wish to export.
Once you have found the table, click the ‘Edit Table‘ link found at the bottom of the table.
PLEASE NOTE: You will need to make sure that you are logged in on the website to see this blue link.
Next, locate and click on the menu TAB titled ‘Import – Export‘, followed by locating and clicking on the ‘Export Data‘ menu command located in the left-hand side menu bar.
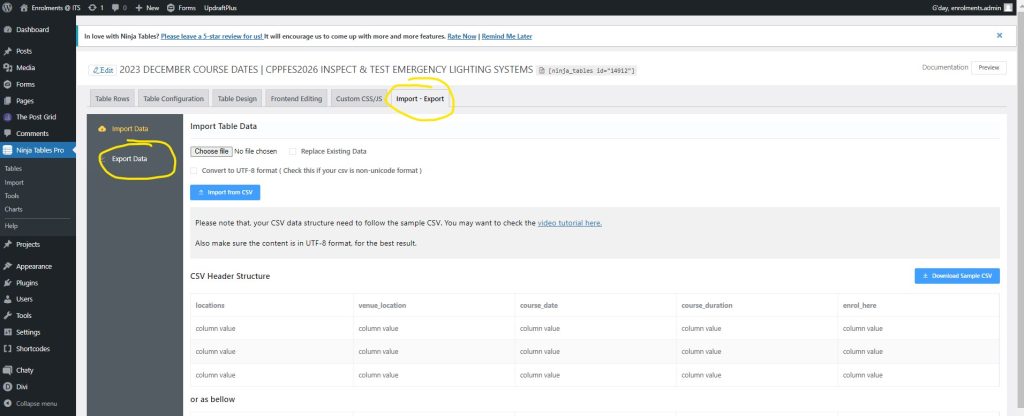
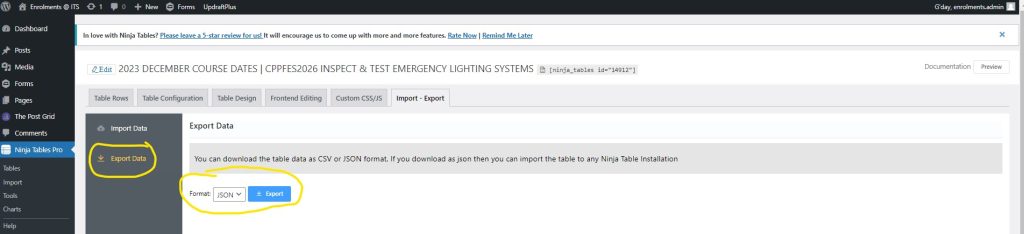
Locate the ‘Format‘ dropdown combo box (see picture below) and select ‘JSON‘ as the preferred format. Then click the blue ‘EXPORT‘ button. This will prompt the website to open a file explorer window allowing you to save the exported file anywhere on your computer.
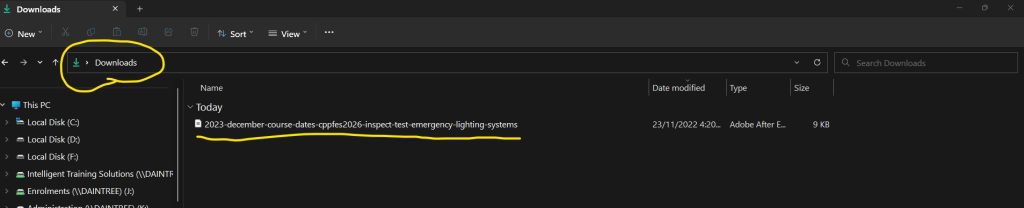
TIP: When saving the exported file to your computer, please make sure you take note of the location of the file, as you will need the file when importing the table. We recommend saving the file in your ‘Downloads’ folder on your computer.
Once the file has been saved (Downloaded) to your computer, you are ready to import the file into another website.
Importing a Ninja Table into a website
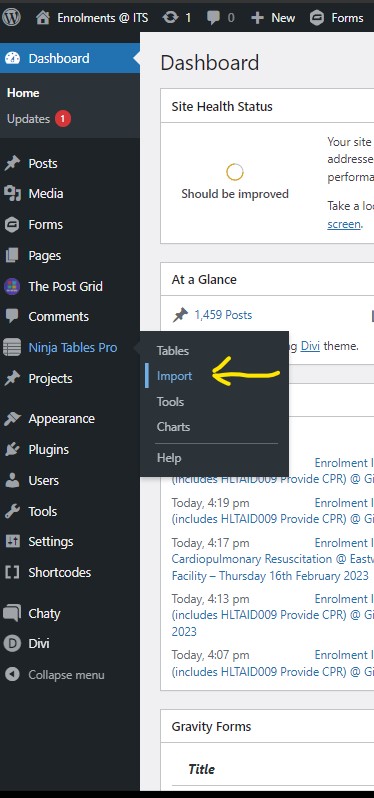
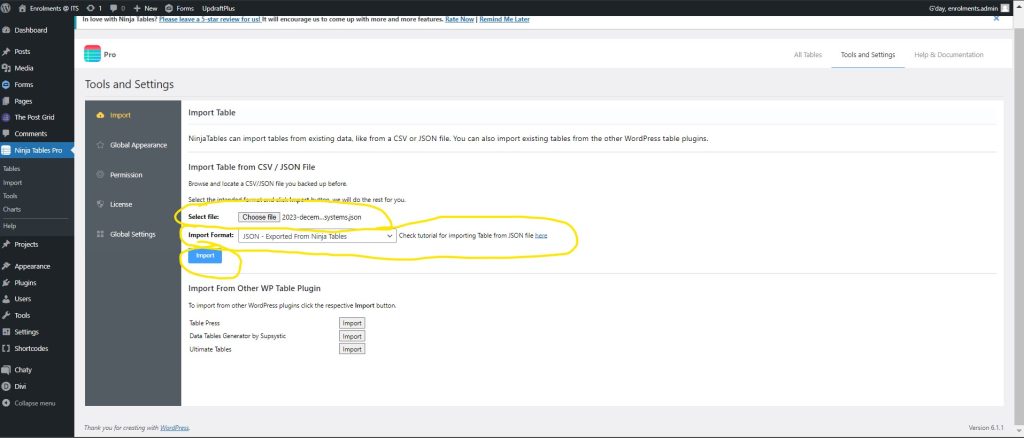
To import a Ninja table into a website, you will first need to make sure that you are logged in to the relevant website. Using the left-hand side menu bar, locate the plugin ‘Ninja Table Pro‘. Hover your mouse over this plugin and select the menu item titled ‘Import‘
Next, locate and click on the button titled ‘CHOOSE FILE‘. This button is located next to the text field titled ‘SELECT FILE‘. Once clicked, a file explorer window will open, prompting you to locate and click on the exported Ninja Table file.
After locating and double-clicking on the exported file, find the text field titled ‘Import format‘ and, using the dropdown combo box, select the format ‘JSON – Exported from Ninja Tables‘. Then click on the blue ‘IMPORT‘ button. This will prompt the website to import the file and open the Ninja Table in the edit screen.
Next, edit the Ninja table’s title to match the style and wording of the original imported table. This is to ensure visual consistency between our websites.
NOTE: You will notice that the imported file will contain the correct words within the table’s title; however, during the export/import process, the title undergoes a format change whereby the title is formatted into lower-case and all the spaces between the words are removed and replaced with the symbol ‘-‘. Please ensure that you rename the title to reflect the original table’s title accurately.
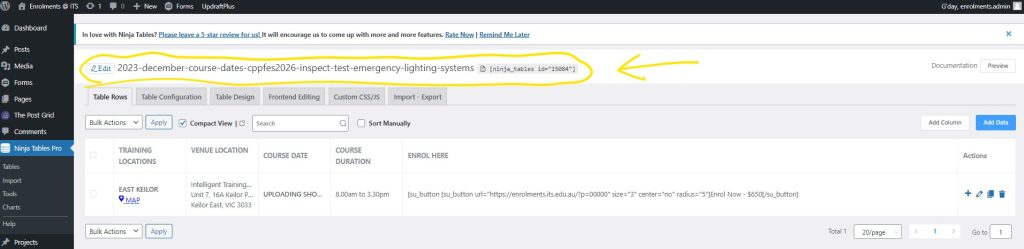
Once the table has been updated, copy the table’s shortcode (see picture below) and paste it into the relevant section of the website.
REMINDER: The shortcode of a Ninja table created in one website, for example, https://enrolments.its.edu.au, will not work on a different website, for example, https://its.edu.au. Remember to check your work on the frontend of the website to ensure you have preformed the tasks correctly.
or